SmartWEB uses a Microsoft SQL Database. The following segment will explain and guide you trough the necessary steps, needed to backup databases, as well as restore them.
Preconditions
In order to create a backup copy
of the database the following is required:
-
Administrator rights on the operating system that the database is running on.
-
Administrator rights on the database.
-
Have the Microsoft SQL Server Management Studio app installed on the server.
Connecting to the MS SQL Server
Start Microsoft SQL Server Management Studio.

Server typefield - select theDatabase Engineoption.Server namefield - enter the name of the server.Authenticationfield selectWindows Authentication(IF you have
SQL Server Authenticationalready set up and you want to use it to access the database, you can select it instead, and enter the username and password in their respective fields, i.e. theUsernamefield and thePasswordfield).- Click the
Connectbutton.
After you have connected to the Microsoft SQL Server, there should
be a panel to the left named Object Explorer in which
elements are located in a structure, resembling that of a tree. The name of the server you are connected to as well, as the username that was used to sign in, should be at the top of the Object Explorer panel. Click on the + symbol (situated on the left side of the element Databases) with the left mouse button.

Under the Databases element the following sub-elements should be visible:
-
System Databases
-
Database Snapshots
The databases of the respective server are situated under these two sub-elements.
Creating a Full Backup
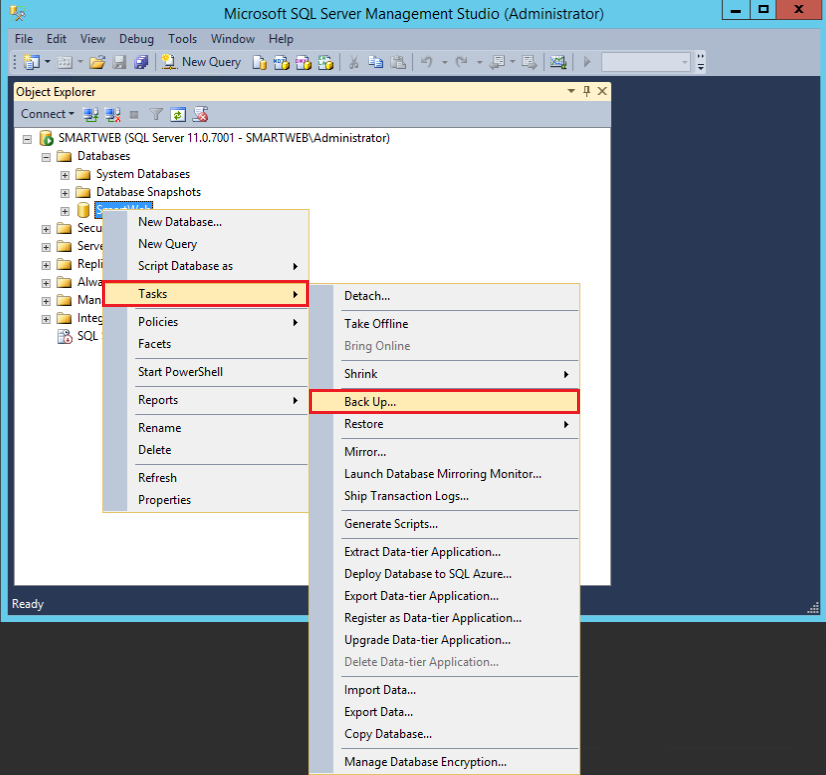
Select the database that you want to backup, by right-clicking
on it. On the context menu navigate to Tasks>Backup.
The following screen should now be visible:

- The
Databasefield points to the database that you are about to backup. - In the
Backup typefield selectFull(full backup copy of the database). - In the
Backup componentfield, theDatabaseoption must be selected. - In the
Destination>Back up tofield theDiskoption must be selected. - Under the
Back up tooption, the path where the copy of the database will be saved is shown.
Attention
Make sure that:
-
There is enough free space on the device on which you want to save the copy of the database.
-
There is no file with the same name in the specified path location(if there is it needs to be renamed or moved to a different location).
If the specifield path of the backup copy needs to be changed, you can use the Remove button on the default path. You can then use the Add button to add a new path to the location you want to save the backup copy to.

In the Destination on disk>File name field the full path can be entered, or click the ... button to select it manually.
Attention
Don't forget to specify the name of the file in the File name field, otherwise the OK button will not become active.
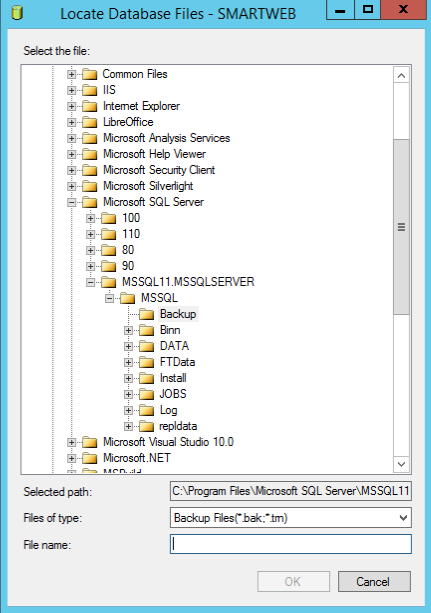
If you are ready, to start the procedure you have to click the ОК button on the Back Up Database screen.
After the process is complete, the following message should appear:

The created file of the backup copy of the database should be relocated by changing its name in a way that it's meaningful. It's good practice for the name to contain the date it was created on. Usually, files with the bak extension take up a lot of room, therefor it's better to compress them.(For instance 7Zip or WinRar can be used).
Creating a Differential Backup
The Microsoft SQL Server also allows the creation of differential backup copies (Differential Backup). The different between a Full Backup and a Differential Backup is that the full backup creates a complete mirror image of the database to the point of its creation, while the differential backup only records the differences from the initial full backup copy.
Attention
Before the differential backup copies of the database can be created, there must be a full backup copy made beforehand.
The resulting bak file from the full backup copy is used to store the differential backup copies of the database.
The advantage of using differential backup copies is that they take up less room. This allows for more frequent use of the partial backup copies.
For example:
If a full backup copy is made once a week, a differential backup copy can be made for each of the days of that week. This allows the state of the database to be restored for an interval of a day, while a full backup copy will restore the state of the database for an interval of a week.
In order to use differential backup copies of the database, the initial full backup copy file must not be moved or compressed after it's created. The reason for this is so that the database can use it to create the differential backup copies. Only after a new full backup copy is created, the older file can be moved or compressed, while also sticking to the practice of giving it a meaningful name.
The process of creating a differential backup copy is the same as creating a full backup copy, with the exception of not needing to delete or move the existing file of the backup copies.

Select the Differential option in the Backup type field.
By default, the system provides a path where the file of the backup copies can be saved. If you want to change the location, you must make sure that the file indeed exists. This can be done by clicking on the Contents button, but not before a destination is selected.
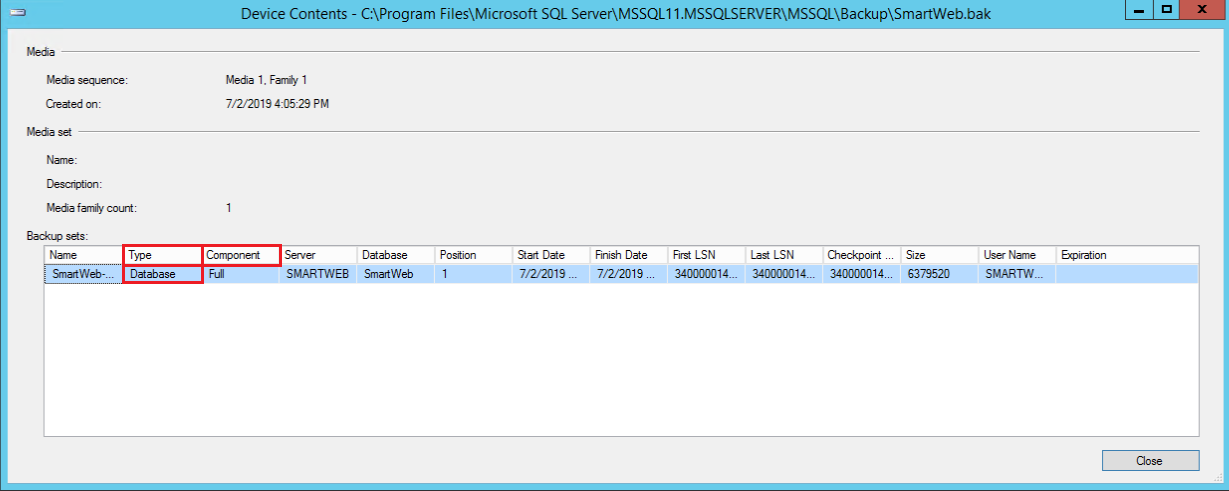
As shown, there must be atleast one full backup copy that can be seen in the Component column with the value Full. There should also be a column with the name Type with the value Database located on the same row.
Click the Close button to return to the previous screen and click the OK button.
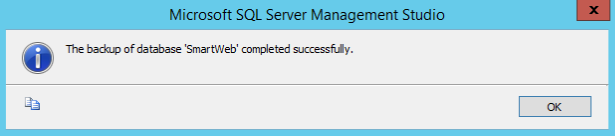
After the process is complete the following message should appear:
Continue by calling the Backup Database screen via the context menu (Tasks>Back Up) and click the Contents button.
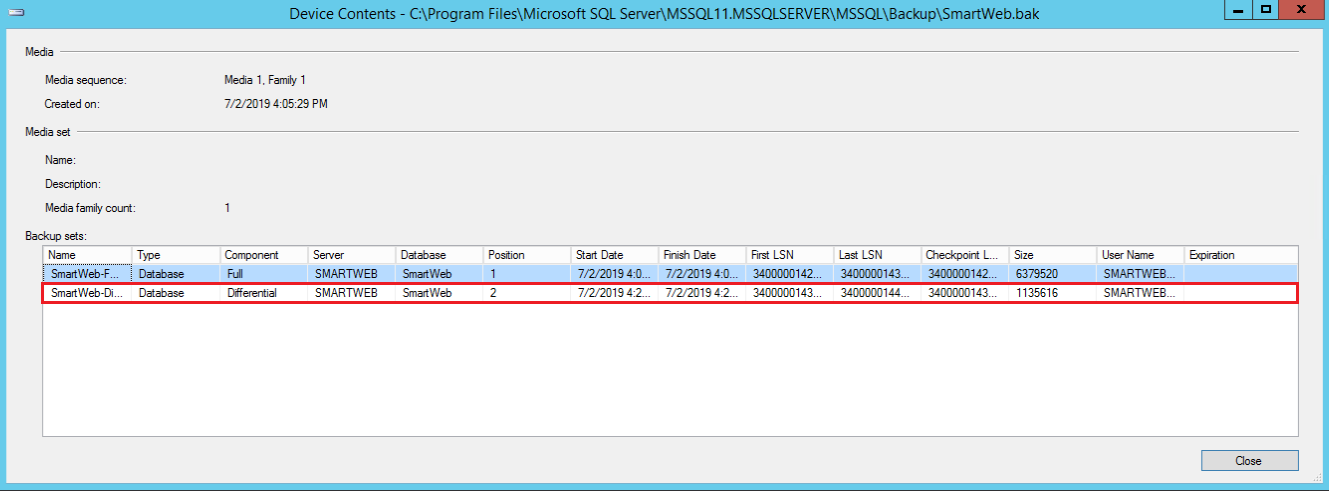
A second row containing the the information of the newly created differential copy should now be visible and it will only contain the changes in the full backup copy up to the moment of the differential copy's creation.
At the end of the week, when a new full backup copy of the database is created, the old file is given a meaningful name, compressed and moved to a different location.
Normally it's possible for a backup copy file to contain a number of consecutive differential backup copies but that will make the file too big, which will make the process of storing it inconvenient. The interval of creating new copies may vary depending on the specific company's policies.
Restoring from a Full Backup
Recovering the database from a full backup copy means that the database will be restored in its entirety, in the state that was saved in the backup copy. The process of restoring the database can be done in the case of an absent or and existing instance of a specific database.
Recovery in the case of an absent instance
The absent instance of a database means that the Database management system is available but the database of interest is not available. This can occur when the database in question is deleted or was never created in the first place.
Connect to the Microsoft SQL Server and make sure that the database you are going to restore is available on the server. If the database is available on the server it will be shown in the Object Explorer>Databases tab. Right-click on the Databases directory.

On the context menu select the Restore Database... option.
The following screen should appear:

At the top of the window there should be a No backupset selected to be restored message. That means that there is no backup copy selected from which to execute the recovery. Select the Source>Device option and click the ... button to the right of the text box.
The following screen should appear:
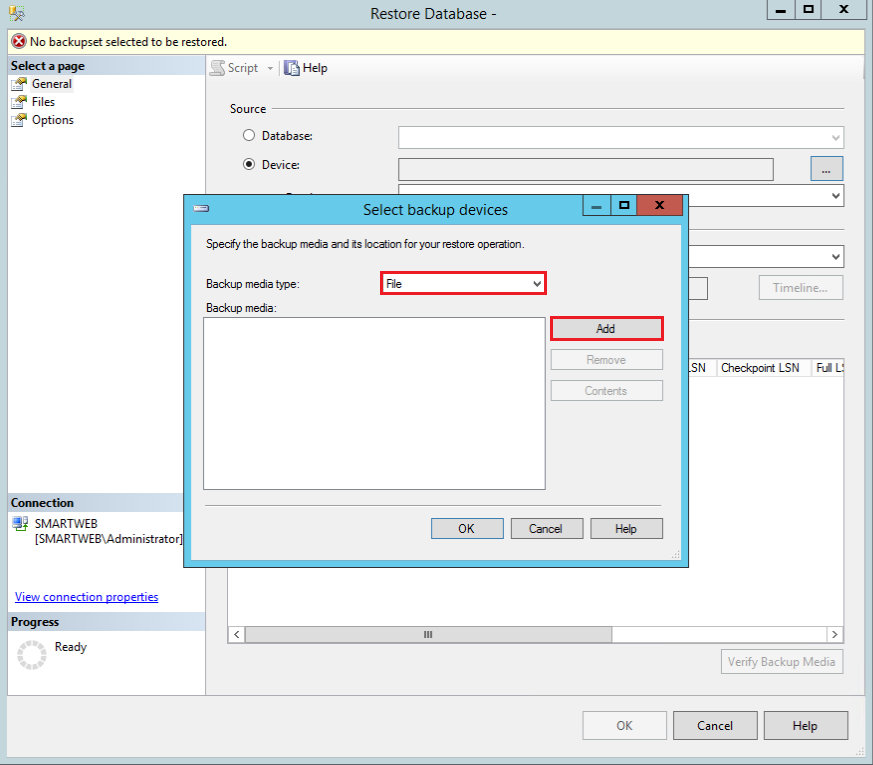
In the Backup media type field, select File from the list and click on the Add button.
The following screen will appear, allowing you to choose the backup copy from which the recovery of the database will be executed:
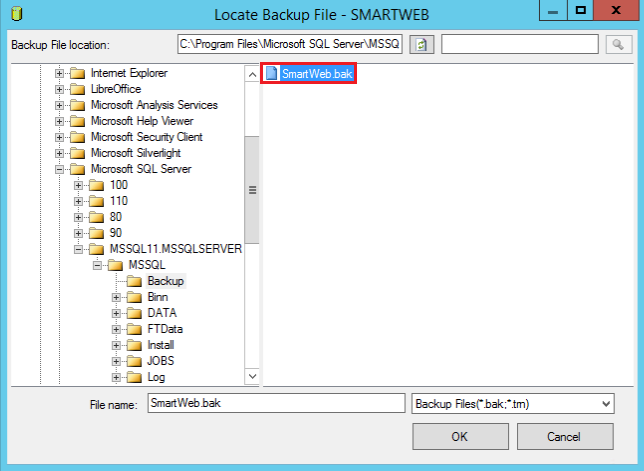
After the file is selected, click the ОК button. In the Backup media field on the screen you should be able to see the name of the file that you have selected.
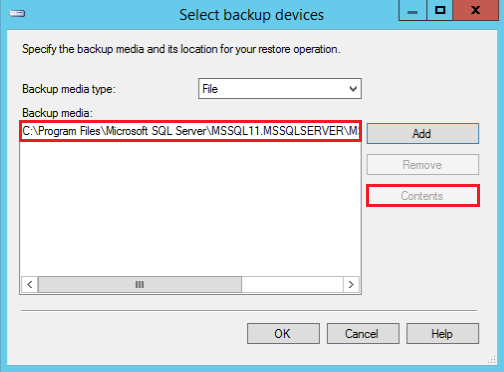
To view the contents of the file select it with the left mouse button and click the Contents button.
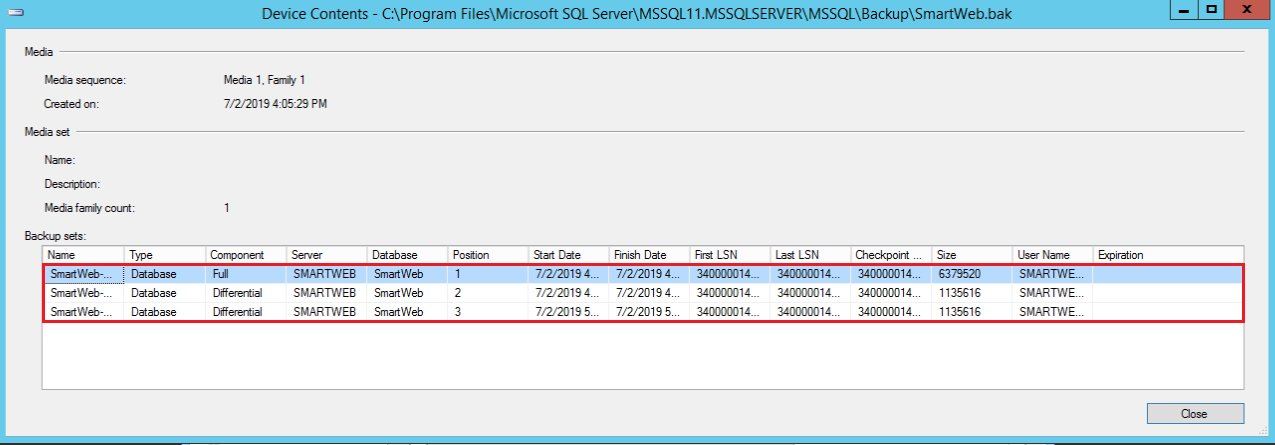
In this case the selected file contains three backup copies. The first one is a full backup copy and the other two are differential backup copies. Click the Close button to return to the previous screen and click the ОК button.
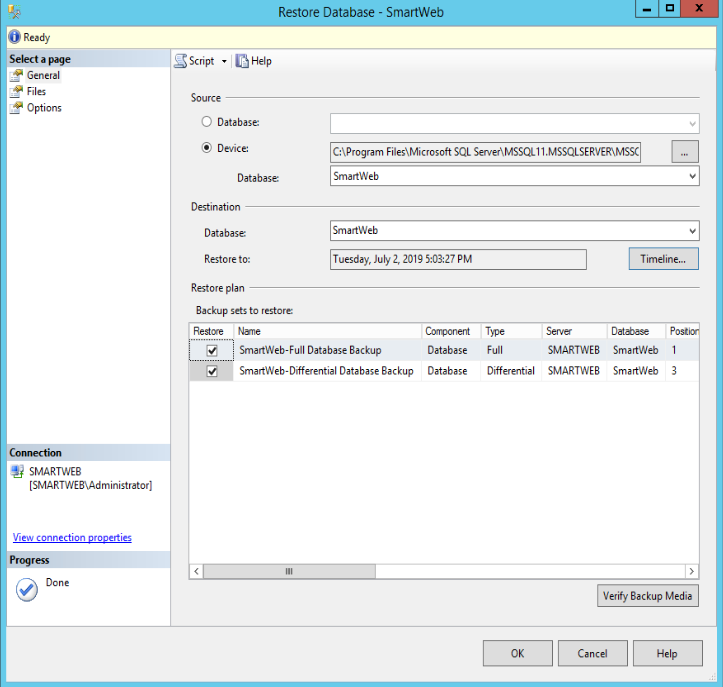
The selected file is loaded and information regarding its contents is displayed.
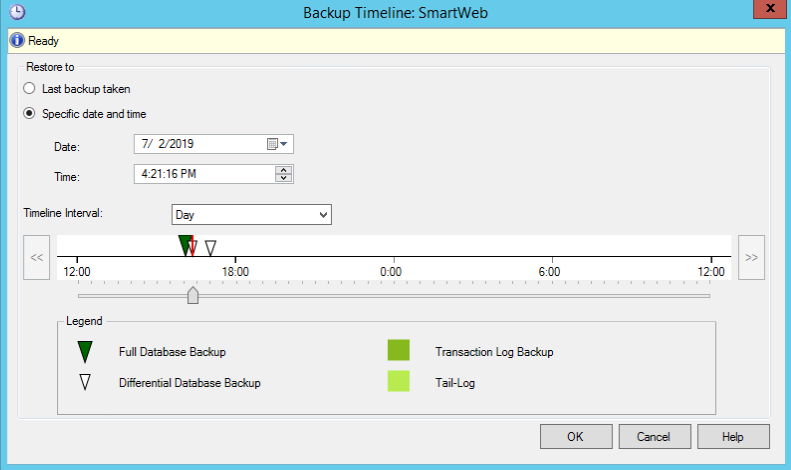
Devicefield - shows the full path to the file that is about to be restored.Databasefield - shows the name of the database.Restore tofield - shows when the last backup copy was made.Backup sets to restoretable - shows the available backup copies. (In the example the first element is a full backup copy and the second one is the latest differential backup copy).Restorecolumn - the copies that we want restored are chosen via the checkbox.Timelinebutton - shows a statistic of when the last backup copies were made.(The filled-in triangles represent the full backup copies, while the ones that are not filled represent the differential backup copies).
Using the Timeline option allows for more precise selection of the interval of recovery and allows you to choose between all available copies, as opposed to the Restore option, which only allows you to choose between full backup copies and their last differential backup copies.

The Backup Timeline option allows you to define the moment of recovery. By default, the
Last backup taken is selected, but if the recovery is required to be done from a different moment in time, the Specific date and time option needs to be selected. After that, with the help of the slider, located under the time scale, specific moments in time, which contain a backup copy of some sort, can be selected. A more precise time interval, the Time interval field can be used, where the options to choose between 1 hour (Hour), 6 hours (Six Hours), a day -- 24 hours
(Day) and a week (Week) are available. In the example there are three backup copies. The first one is a full backup copy and the following two are differential backup copies. Since we want to make a recovery from the full backup copy, well choose the filled-in triangle by using the left mouse button on it or moving the slider to the required copy. The selected backup will have a red line on it. The date and time of the copy, from which the recovery will be done, can be viewed to make sure that the correct moment in time is chosen. Click the ОК button to confirm the changes.
The Backup sets to restore table visualizes only the copies that will be restored. In this case only the full copy. If the goal was to restore the first differential copy,then the full backup copy would be displayed, and the differential copy, that would be used for recovery, would come after it. This is done because the differential copies require the full copy ,from which they originated, to be restored first.
Click the Verify Backup Media button to check the file of the copies for mistakes. If everything is in order, the Backup media verified successfully will be displayed at the top of the screen.
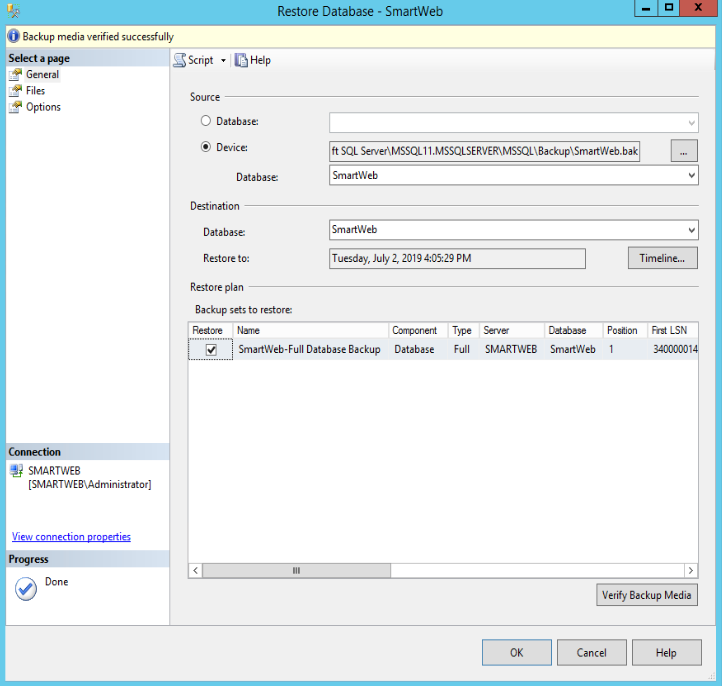
Attention
It's important to note that the database management system will try to recover the database from the backup copy, but it will also want to save the file paths of the specific database. It's possible there isn't a device with the same letter on the server where we want to execute the recovery or the database is required to be placed somewhere else.
In that case navigate to Restore Database and select Files on the Select a page menu.
The following screen should appear:
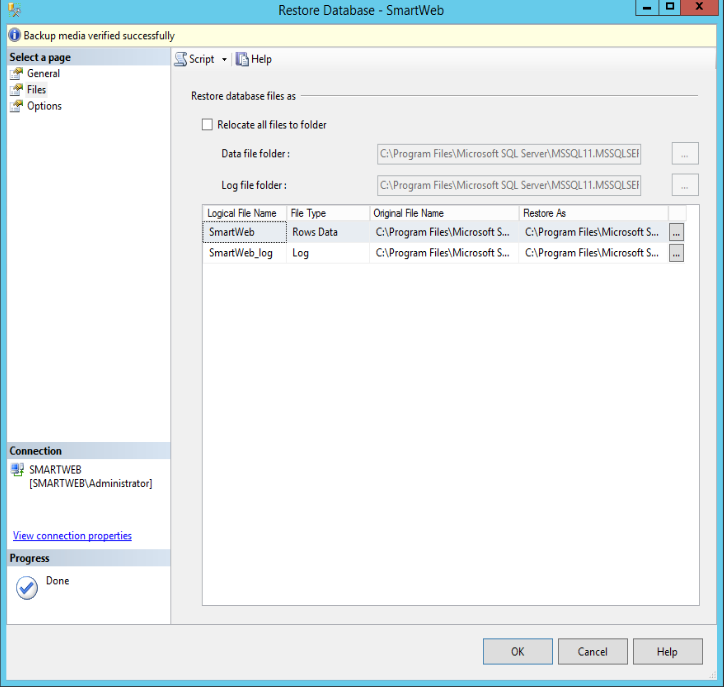
To change the location of recovery, the Relocate all files to folder checkbox must be selected, after that the directories, where the files of the database are stored, can be changed.
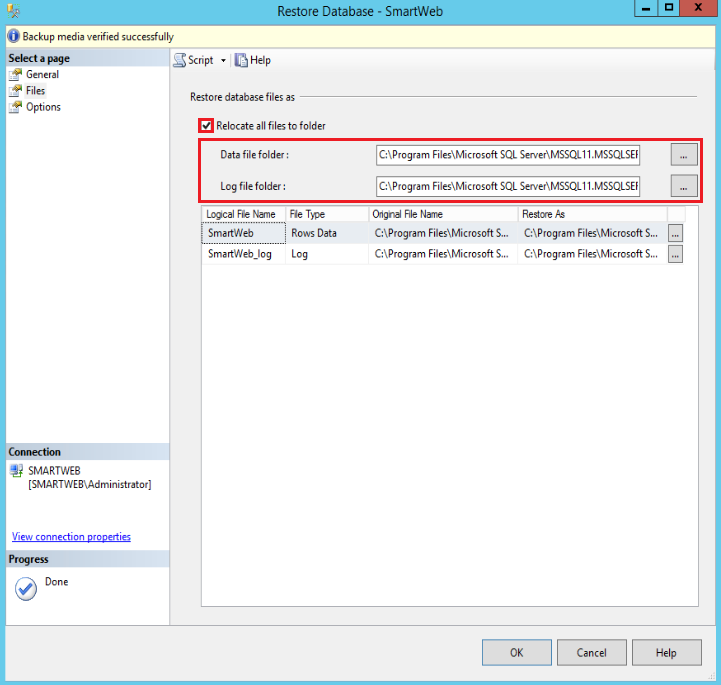
There are two types of files - data files and logs. Their paths are defined according to what is written in the Data file folder and Log file folder fields. The paths can be changed by correcting the specific text fields or by using the ... buttons to select them manually.
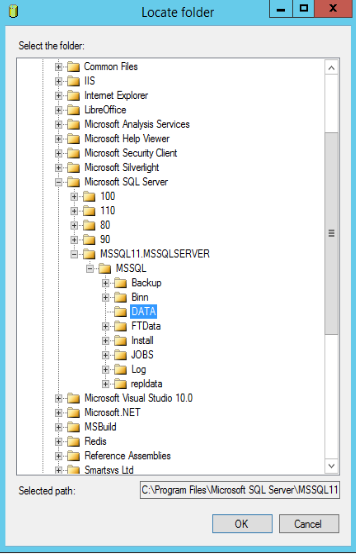
It's good practice for them to be stored in the same location. In this case we won't change their location so we will uncheck the Relocated all files to folder option. Using the Select page panel in the Restore Database screen, select General to go back. The recovery process will start after clicking the OK button.
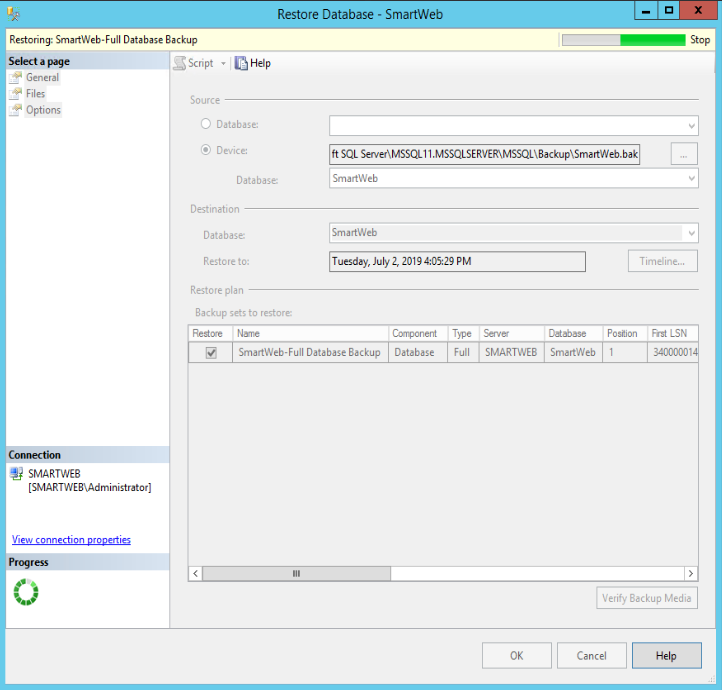
If the recovery is successful, the following message will appear:
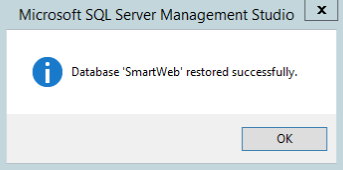
The newly restored database should be located under the Databases tab.
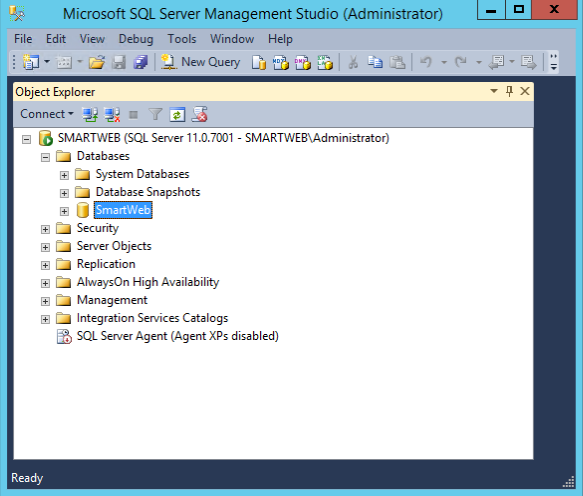
After restoring the database from a backup copy, a resynchronization of the account access is required. In order for the resynchronization to be done, the usernames that need to be restored and are used by the system need to be known. Click the + to the left of the restored database in the Object Explorer and navigate to the Security>Users tab.
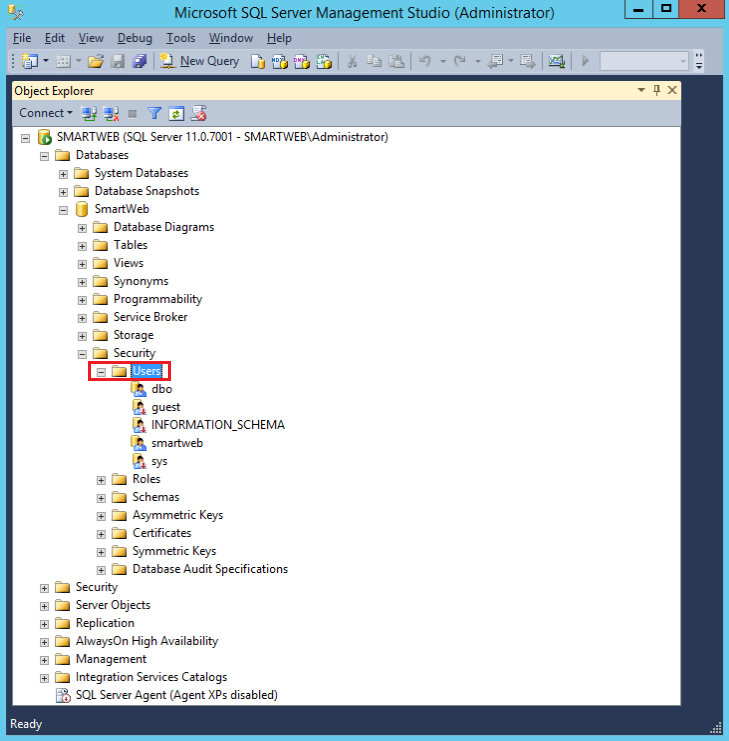
Look for users that are not part of the following: dbo, guest, INFORMATION_SCHEMA, sys.
After the specific users are known, right-click on the restored database and select New Query.

A new panel will appear to the right of the screen. Its role is to send requests to the selected database.
Attention
Be careful not to select a different database!
Note
Hover over the name of the panel with your mouse to check which database the panel is connected to.
In the example, the user that needs to be resynchronized is smartweb. Write the following command in the panel to the right:
EXEC sp_change_users_login 'Auto_Fix', 'smartweb', NULL,' smartwebtester'
and press the Execute button.
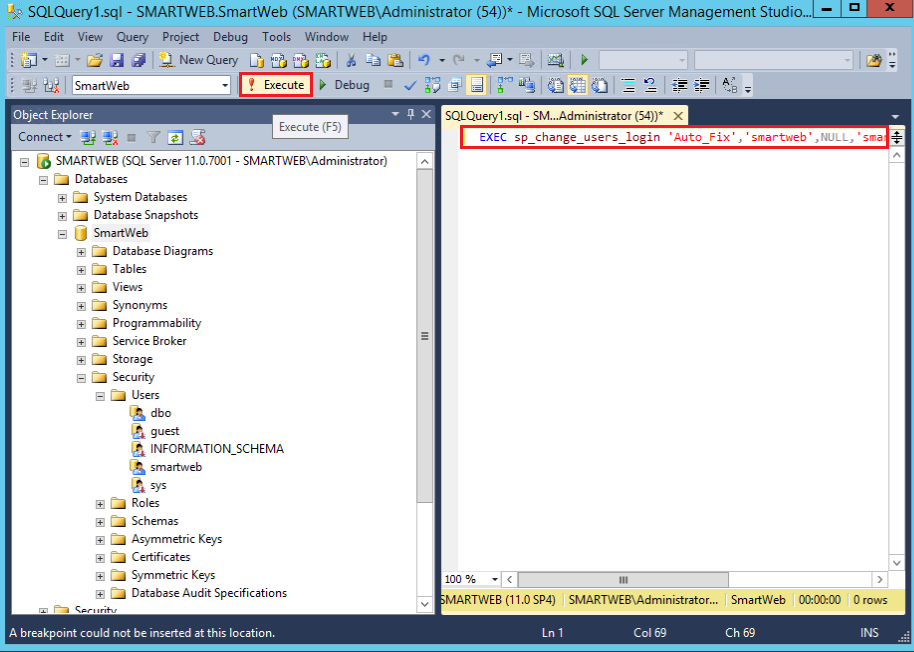
The last argument of the command is smartwebtester. It represents the password of the user that is going to be created. If this user already exists, the password will be ignored.
You can view the newly created user by navigating to
Security\>Logins, located under the Databases tab.
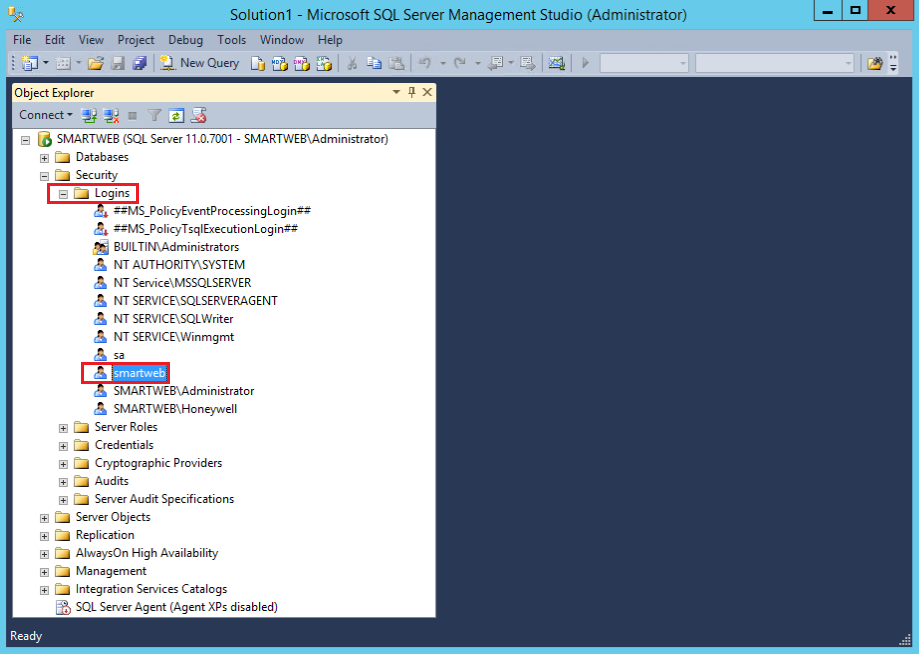
Right-click on the user and go to Properties. The following screen should appear:
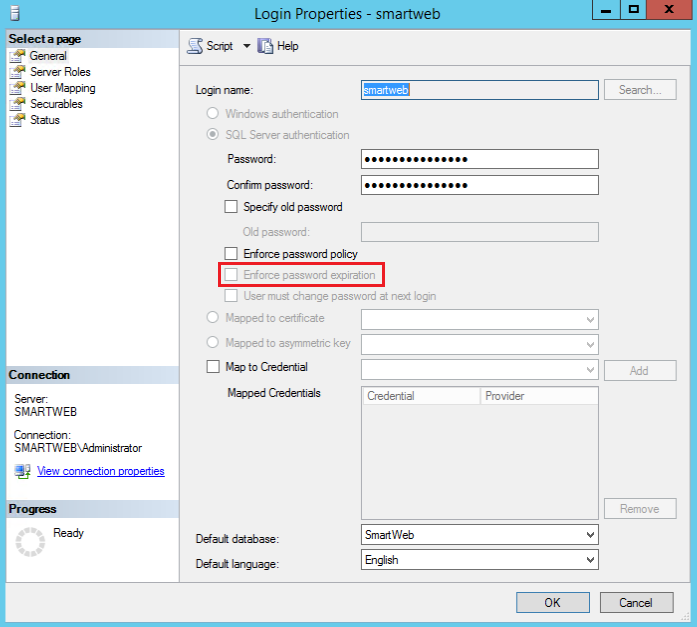
Make sure that the Enforce password expiration option is disabled.
Otherwise, the user will be prompted to change his password after a certain period, and will not have access to the database until the password is changed.
The last step is to check if the synchronized user has access to the restored database.
Navigate to the File menu and select Connect Object Explorer.

Complete the following steps:
Server typefield - selectDatabase Engine.Server namefield - enter the name of the server you want to connect to or select it via the drop-down list.Authenticationfield - selectSQL Server Authentication.LoginandPasswordfields - enter the name and password of the user.- Click the
Connectbutton.

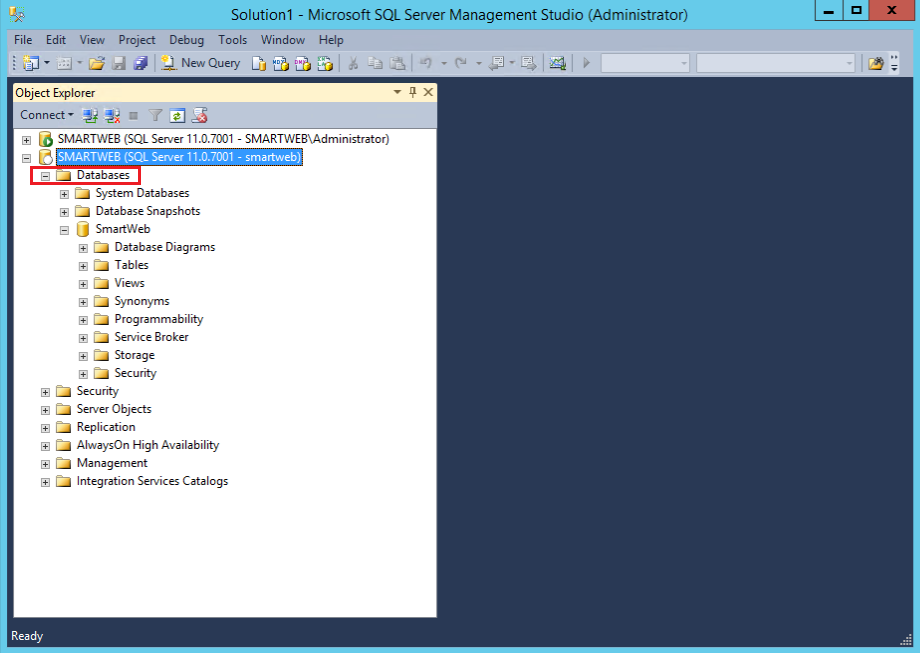
In the Object Explorer under the server connection element at the top, there should be a new element. This element represents the synchronized user's connection to the database. Navigate to the Databases tab, if the elements under the restored database tab can be reached, the process is successful and the user has access to the database.
Attention
In order to use the SQL Server Authentication,
the Database Management System of the Microsoft SQL Server needs to be set to SQL Server and Windows Authentication mode, which is set following or during the server installation.
When restoring a database, the user in question may need to be re-mapped manually. This is done with the help of the following command:
USE {database};
ALTER USER {user} WITH login = {login}
Example:
USE SmartWeb;
ALTER USER smartweb WITH login = smartweb
In the case where this method proves inefficient, navigate to the following directory:
C:\inetpub\SmartWeb\App_Data\Sites\Default\Settings.txt
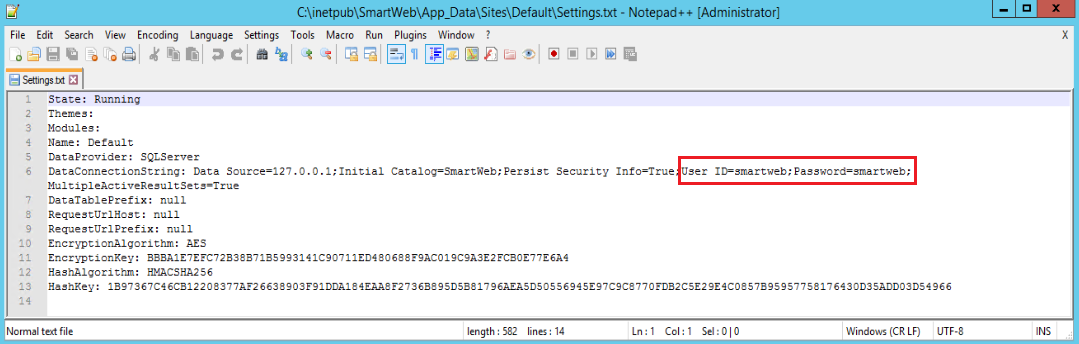
From here, the password of the user can be seen on the sixth row - ID=smartweb;Password=smartweb;.
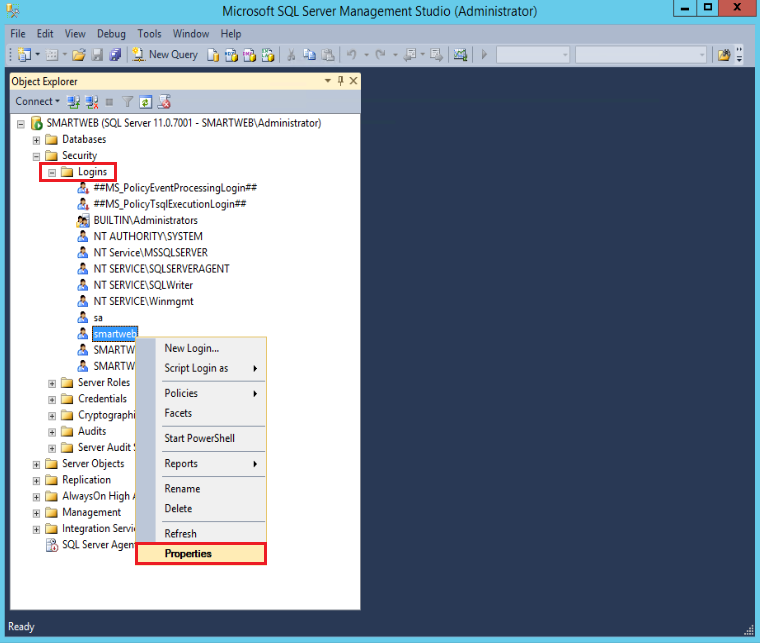
It can then be changed via SQL Server Management Studio by navigating the the user in the Security\>Logins directory.
Recovery in the case of an existing instance
The process of restoring the database in the case of an existing instance is the same as the one used for restoring it from an absent instance with a few peculiarities:
-
When a database is being restored from an existing instance, it is necessary that all systems that are currently using the database, temporarily stop working with the database or are disabled. In the case of
SmartWEB, the system must be disabled. -
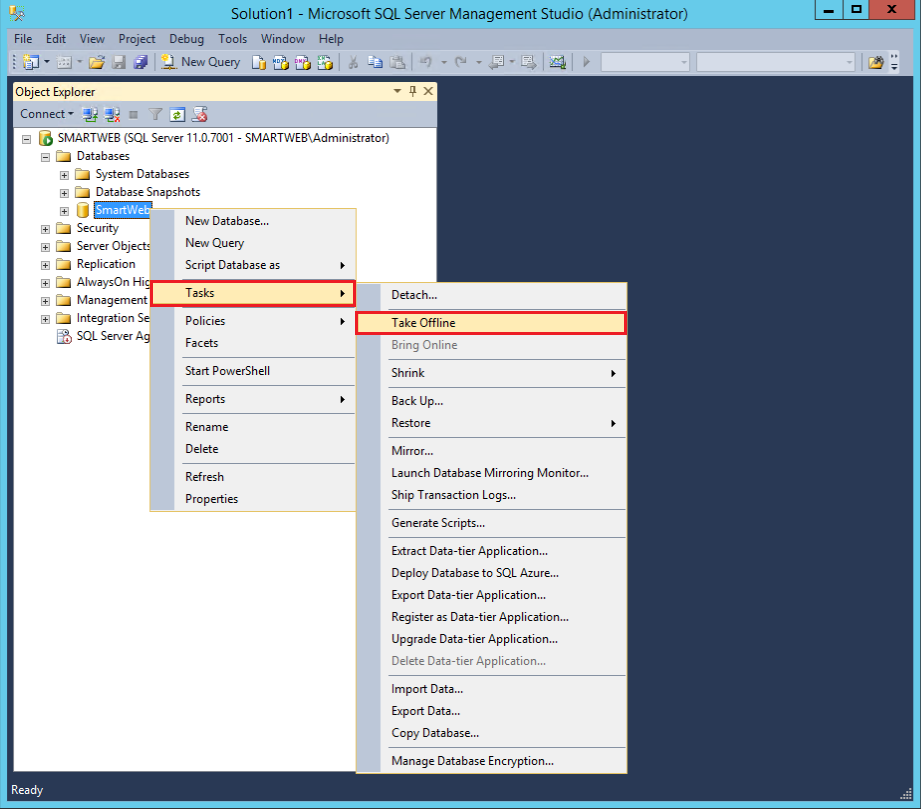
After connection with the Database Management System has been established, from the
Object Explorer, navigate to theDatabasestab and right-click on the database that you want restored. From the following context menu selectTasks\>Take offline. The database will then be disabled and can't be used by any system.
If the database is successfully disabled, the following screen will appear:
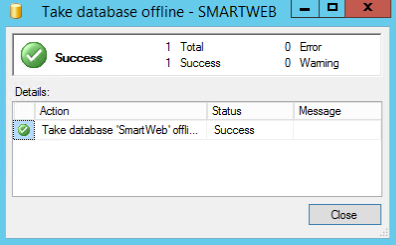
Click the Close button.
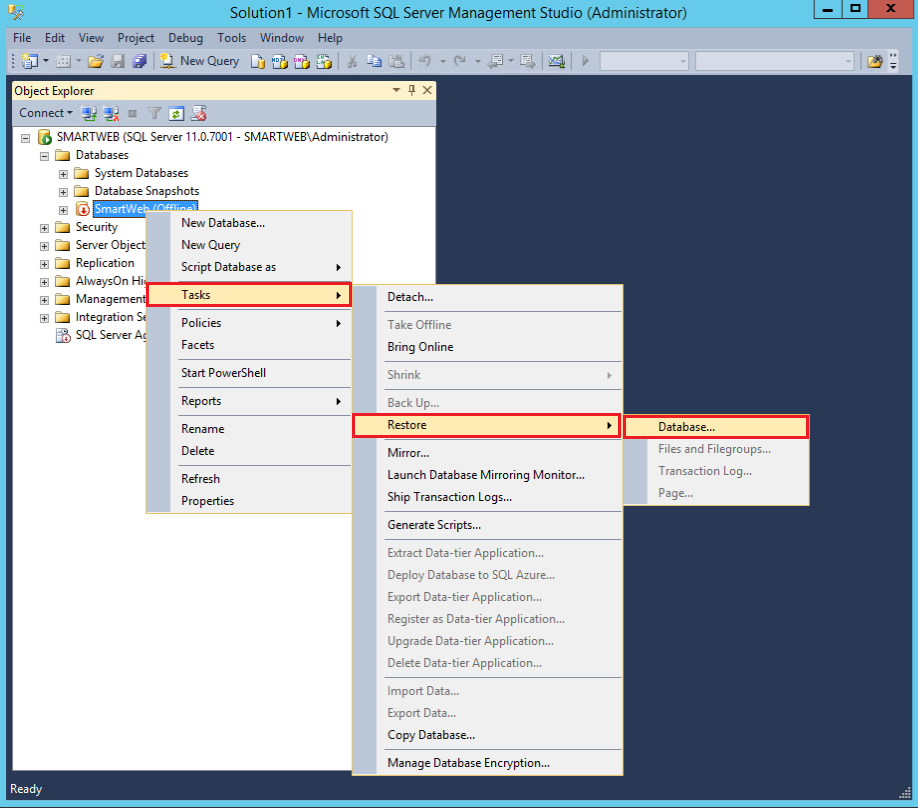
Right click on the offline database. From the context menu, navigate to Tasks\>Restore\>Database.
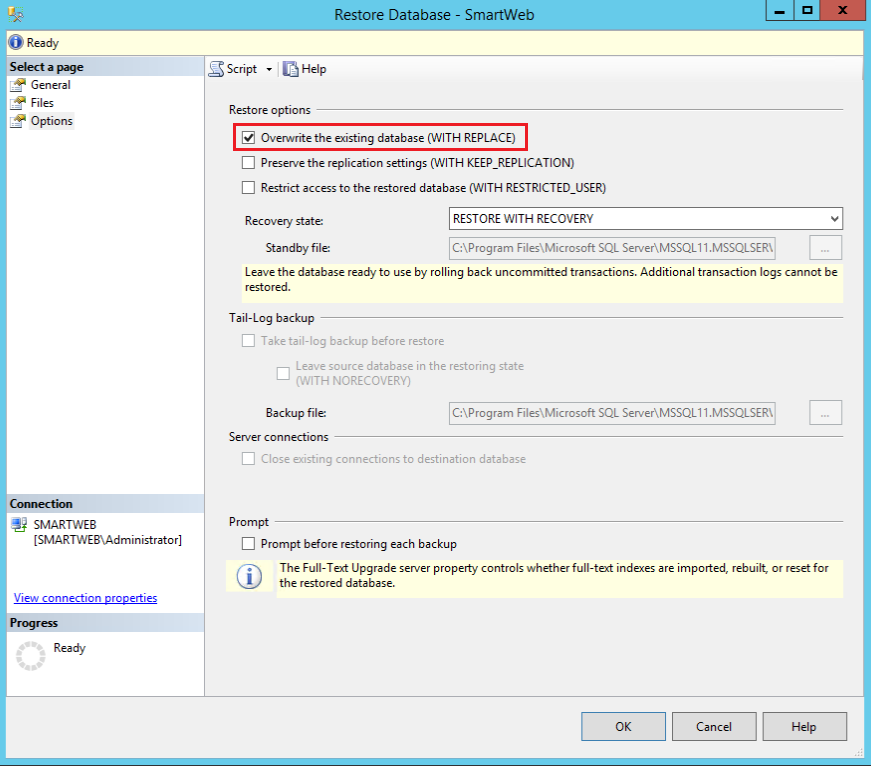
On the Restore Database screen, from the Select a page panel, go to Options and enable the Overwrite the existing database (WITH REPLACE) option.
From the Select a page panel, navigate to General. From there, the procedure is the same as with the full backup copy segment.
Restoring from a Differential Backup
Restoring the database from a differential backup copy is the same as restoring it from a full backup copy with the following
peculiarity. Prior to restoring a differential backup copy, the full backup copy, from which it is derived, must be restored beforehand. This is done automatically via the Microsoft SQL Server Management Studio, when the differential backup copy is selected in the
Backup Timeline screen.
Configuring an Automatic, Scheduled Database Backup
When the transaction log overflows, Microsoft SQL Server DBMS
reports an error 9002. The log can overflow when the database
is active (online) or in recovery mode
(recovery). If a log overflows while the database is active, the database remains active in read-only mode. If the log overflows in the process of recovery, the Microsoft SQL Server DBMS marks the database with the RESOURCE PENDING flag. In both cases, human intervention is required
to provide space in the transaction log.
For a FULL or "BULK-LOGGED database recovery model, one of the reasons for the overflow of the transaction log is
the absence of a timely backup of the log. If a backup was never made, two backups must be created in order for
the database to be able to clear the log up to the last backup.
Clearing the log creates space for new entries. New backups of the transaction log must be created periodically to keep the log from overflowing. These backups can be done manually (like in the
Backup Type field, where the Transaction Log is selected, as shown
in the figure below).

or they can be set to be done automatically.
Create a folder named C: \\ DB \ _Backups in the file system,
which will store the backups of the the database.
Connect to the Microsoft SQL Server DBMS using
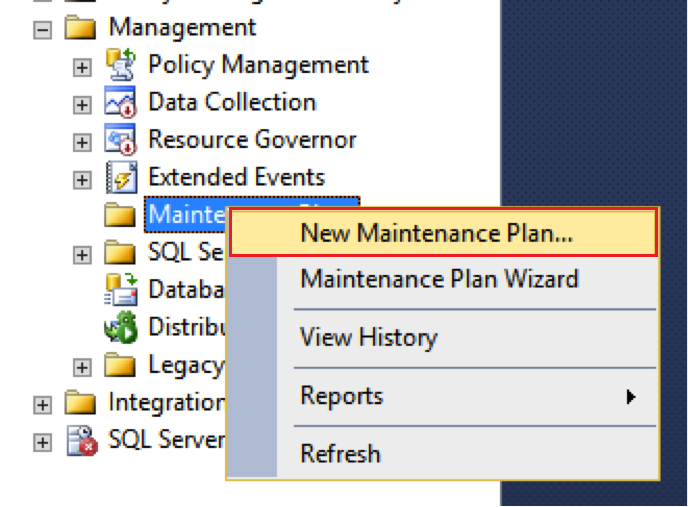
SQL Management Studio. From the left navigation panel, expand
Management and right-click Maintenance Plans. Select New Maintenance Plan ... from the context menu.
If you see an error message about the Agent XPs component,
then you need to execute several T-SQL requests to enable the
advanced settings and Agent XPs component.

Open a new query window by clicking on New Query from the toolbar, as shown in the figure below.
Type the following commands in the query window:
sp\_configure \'show advanced options\', 1;

GO

RECONFIGURE

GO

sp\_configure \'Agent XPs\', 1;

GO

RECONFIGURE

GO

Press the Execute button to execute the entered commands
After enabling the Agent XPs component, we proceed with step - New Maintenance Plan.
Creating a sub-plan for a complete database backup
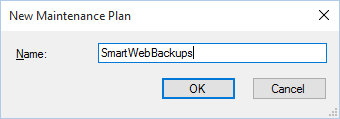
Press the OK button to confirm the name, after which, a screen with the MaintenancePlan will show up.
There will also be a Subplan with the name Subplan_1.
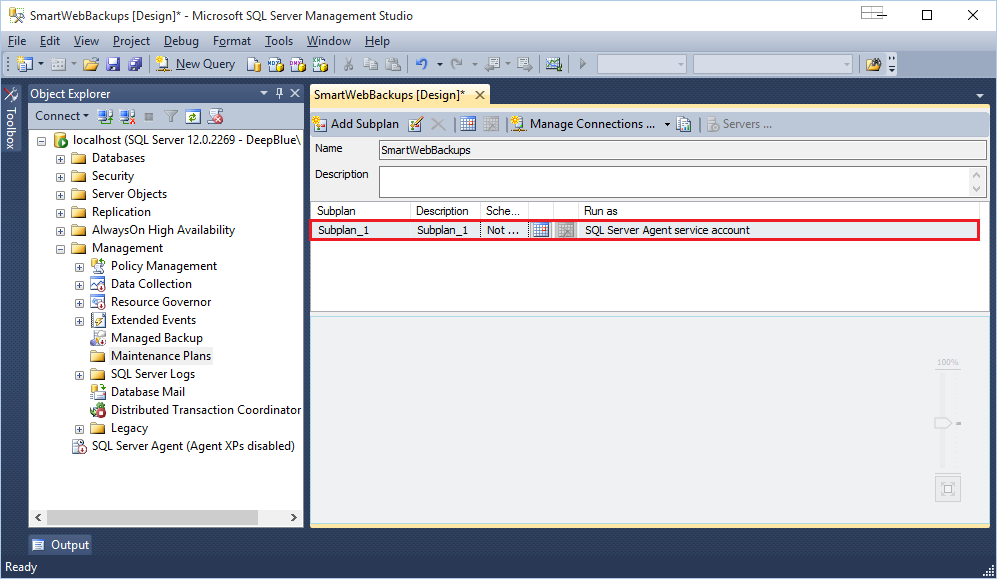
Double-click Subplan_1 with the left mouse button. The screen shown in the figure below will appear.
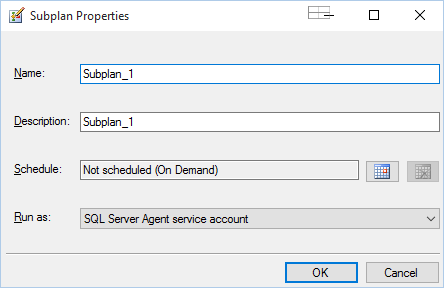
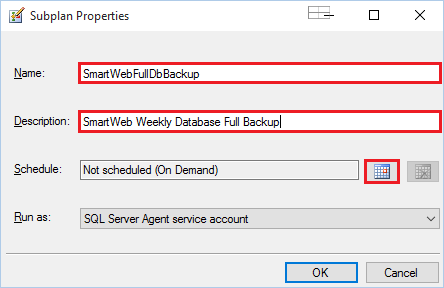
Rename the plan (Name field) to
SmartWebFullDbBackup. In the description (Description field) write
SmartWeb Weekly Database Full Backup. Click the calendar from
Schedule as shown in the figure below:
Configure the settings as shown in the figure below:
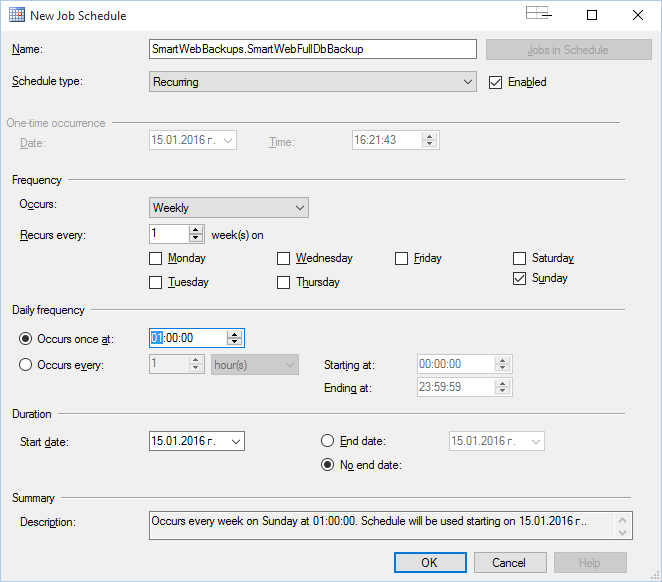
Press the OK button to confirm the changes. The task is now set to be performed once a week on Sunday at 1am.
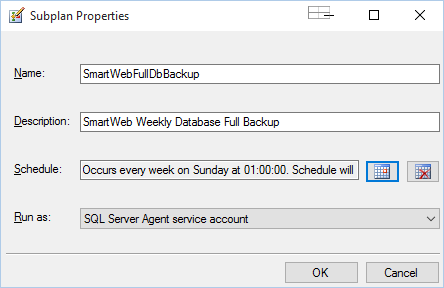
Press the OK button again to confirm the changes. To add the plan with the changes thus far, you have to save the changes by pressing the respective button from the toolbar. If the process is successful, the asterisk in the panel name should disappear.

Once you have saved the plan, select the order of the sub plan that
we created by clicking on it once. Select Toolbox from the left side.
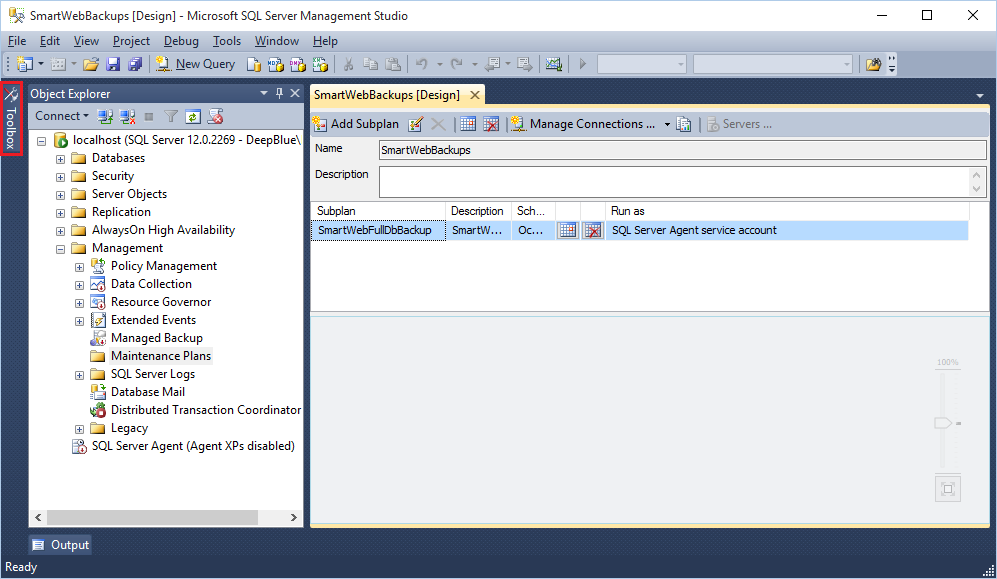
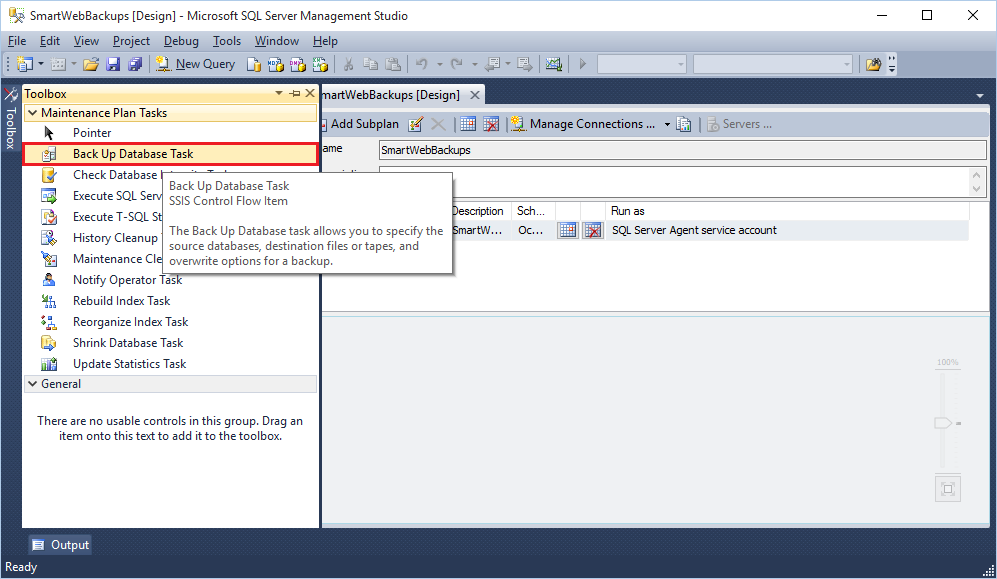
From the tools, select Backup Up Database Task and drag it to
the empty space under the sub-plan.
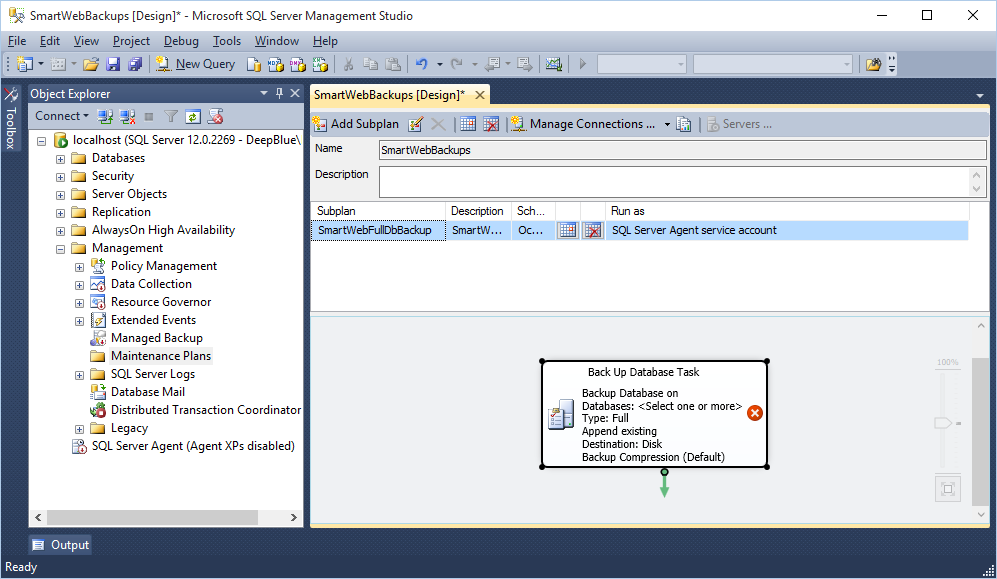
From the popup menu that appears, right-click on a task that was just started. Select Edit(Depending on the version
SQL Management Studio screens may differ).
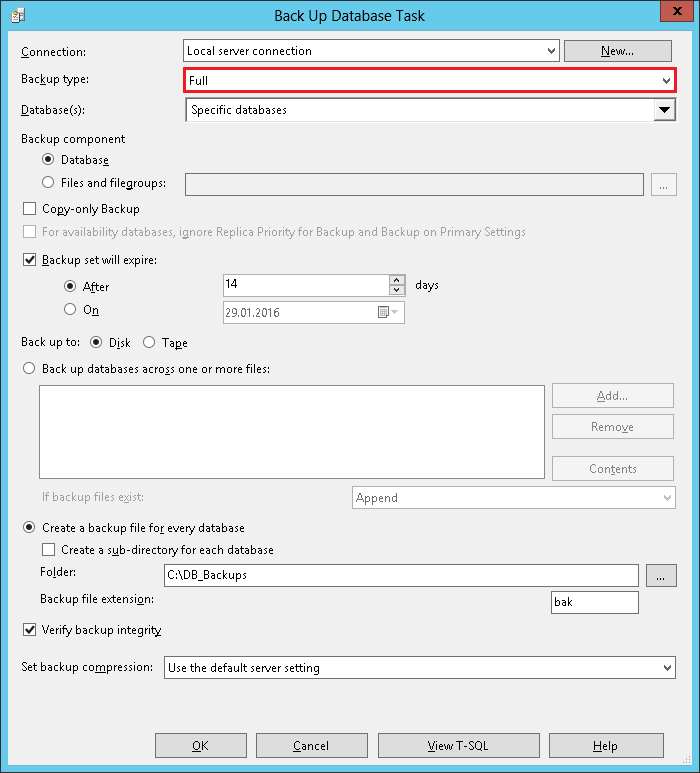
In the Backup Type field, select Full, under Databases select
the desired database, in this case - SmartWeb.
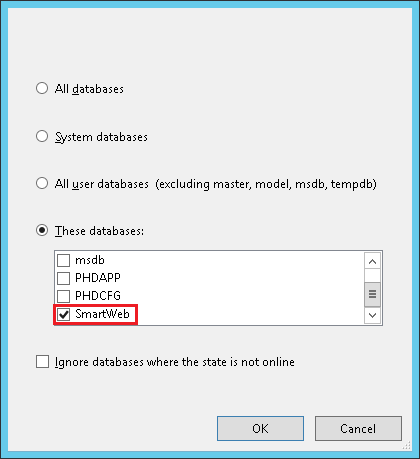
Configure how long the backup copy will be kept. This depends on
the free space you have. To do this, check the Backup set will expire: option, select After and enter the number
14, i.e. the copy will not be overwritten for 14 days. If 14 days does not seem sufficient, the time interval can be increased, but consider
how much free space is available.
Under Create a backup file for every database, in the Folder field,
select the folder we created to save the copies to
(C: \\ DB \ _Backups). Check Verify backup integrity to look for any errors in the backup.
Press the OK button when you're done.
Save again (the toolbar diskette or from the menu -
File > Save). The asterisk from
the name of the plan should disappear, if it is still visible, that means the plan has
unwritten changes - save them.
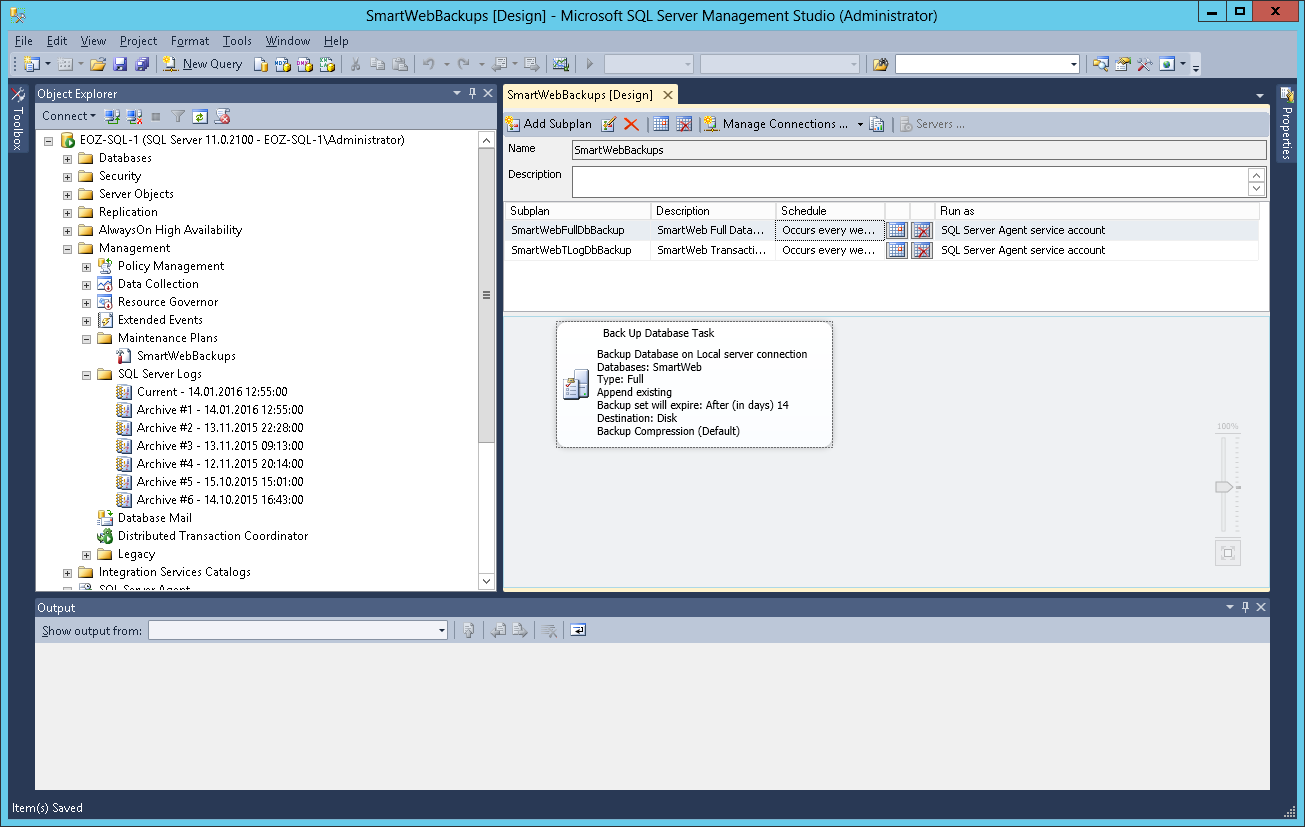
With what we have shown so far, we have created a support plan SmartWebBackups in which there is a sub-plan with a name SmartWebFullDbBackup, which will run every Sunday at 1 a.m. In this sub-plan, there is a task to create a full backup of the SmartWEB database that will be kept 14 days without being overwritten.
Creating a sub-plan for a transaction log backup
The next step is to create a sub-plan for a transaction log backup. To do this, click on the
Add Subplan button in
maintenance plan toolbar.
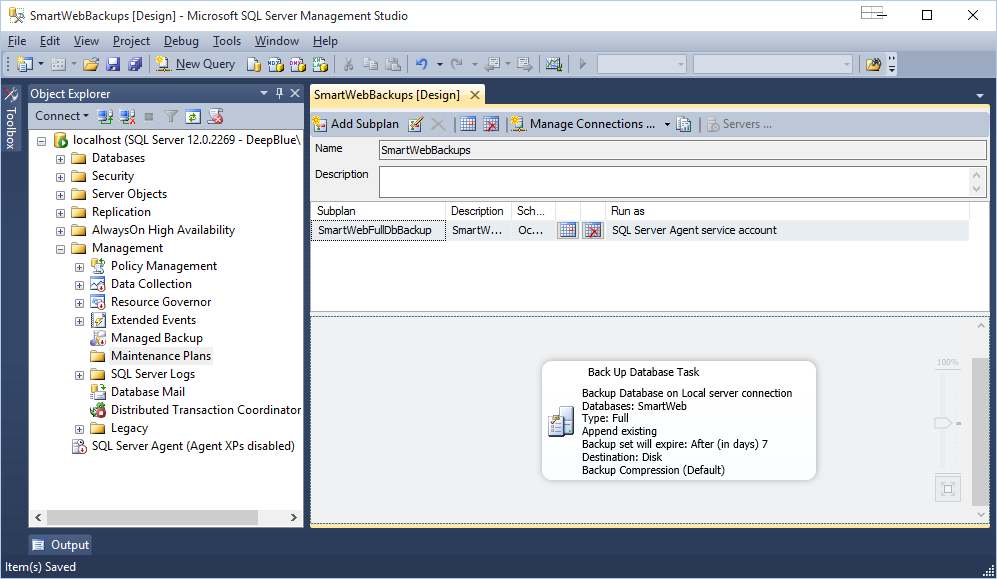
Enter a name and description as shown in the figure below.

Set the time of execution by selecting the calendar from Schedule, as shown in the figure below.
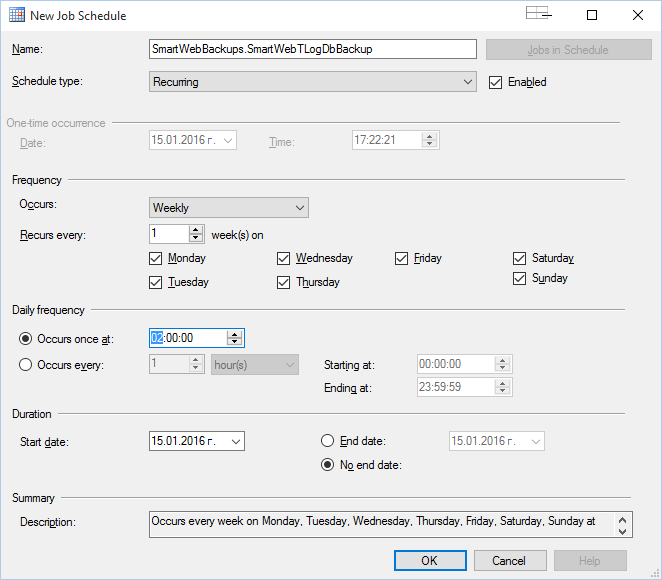
The plan will be executed from Monday to Sunday at 2 a.m., as there is a full backup scheduled on Sunday at 1 a.m.
Press the OK button, then save the plan (File > Save). After successfully saving the plan,
the asterisk in its name should disappear. Similarly to
the previous sub-plan we created, select the order of the new sub-plan. From the Toolbox drag Back Up Database Task into
the empty space under the plan.
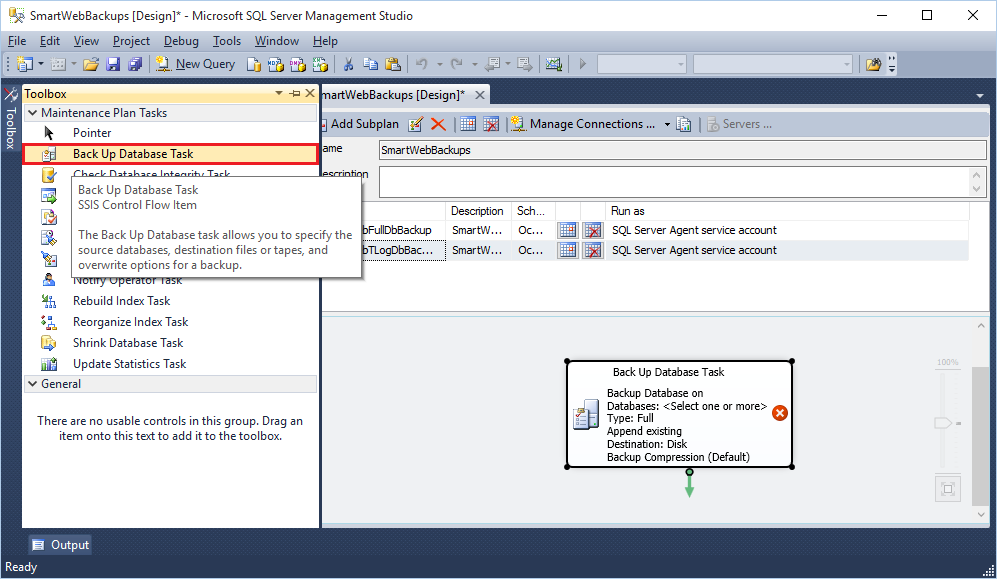
Right-click on the task that was just created -
Backup Database Task, and select Edit from the context menu.
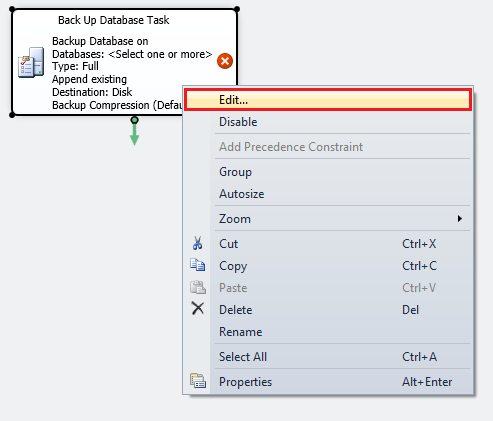

In the Bacкup Type field, select Transaction Log. In the
Databases field, select the database you want, in this case - SmartWeb.
Set the amount of time that the backup copy will be kept for. This will depend on the amount of free space on the machine. To do this, check the Backup set will expire: option. Select After and enter the number 14, i.e. the copy will not be overwritten for 14 days. If 14 days does not seem sufficient, the time interval can be increased, but consider
how much free space is available.
Under Create a backup file for every database in the Folder field
select the folder we created to save the copies to
(C: \\ DB \ _Backups). Check Verify backup
integrity to look for any errors in the backup.
Press the OK button when you're done.
Save again (the toolbar diskette or from the menu -
File > Save). The asterisk from
the name of the plan should disappear, if it is still visible, that means the plan has
unwritten changes - save them.
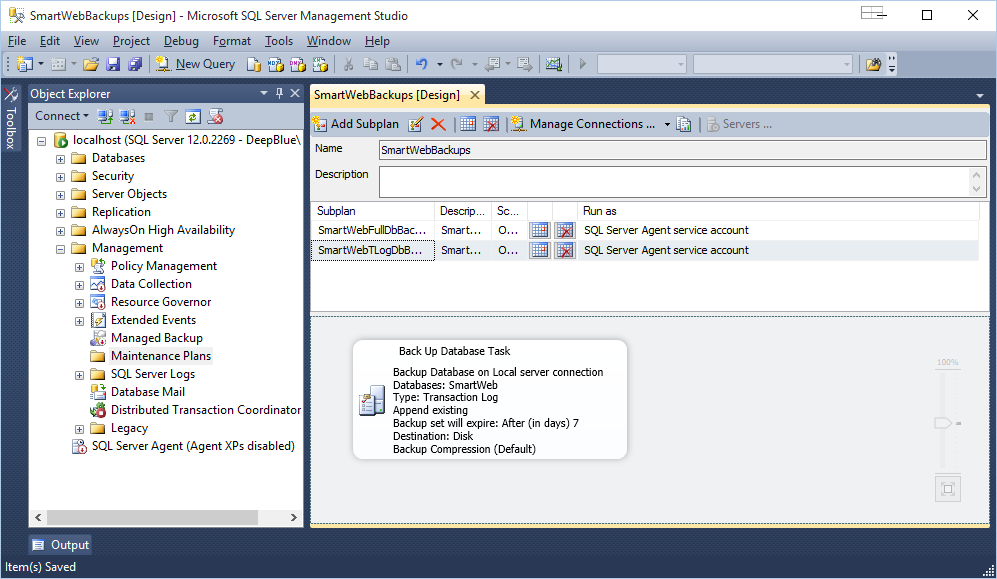
We've added a sub-plan named SmartWebFullDbBackup that will be executed every day at 2 a.m., and this sub-plan has the task of creating a transaction log backup of the SmartWeb database. This backup will be kept for 14 days, without being overwritten.
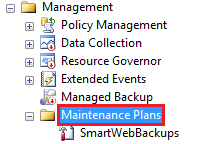
Once you have saved the maintenance plan, right-click on Maintenance Plans in the Object Explorer to see the newly created plan.
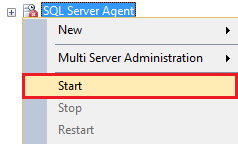
Right-click on SQL Server Agent in the context menu, select Start to start the
the agent.
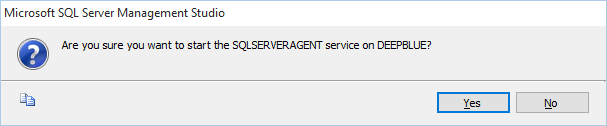
If you see a screen similar to the one below, press the
Yes button.

When you see a screen similar to the one below, press the
Yes button.
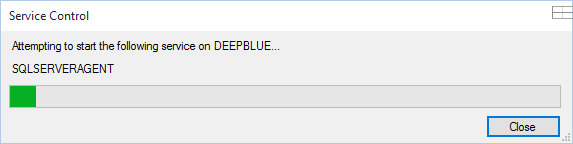
The SQL Server Agent should now work. You can go to Jobs and see
the tasks that are configured.

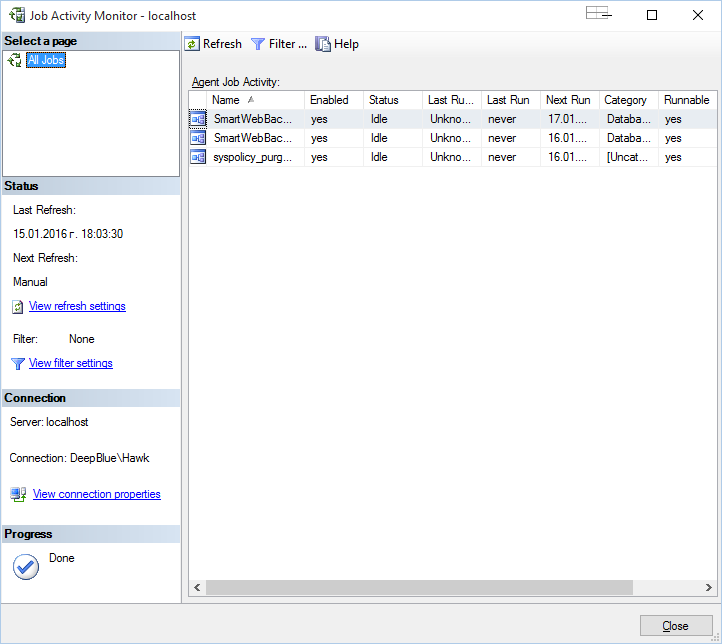
Double-click Job Activity Monitor (or right-click and select View Job Activity) to view the status of
tasks.
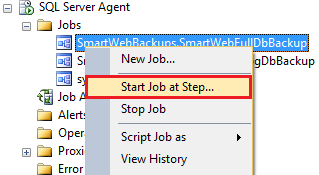
To run one (or more) tasks to test,
right-click on the task and select Start Job Step ....

Start the Job Activity Monitor again to see the status of
the task that was just started.

The backup files can be viewed in the C: \\ DB \ _Backups folder.

The final step is to make sure that the SQL Agent Service will
always be started. Open Services from the Control Panel (via
services.msc from the console, or from
Administrative Tools>Services).

Scroll-down until you reach SQL Server Agent (...). The Startup Type is set to Manual by default.
Right-click on the service and select Properties. Then set the Startup Type to Automatic.
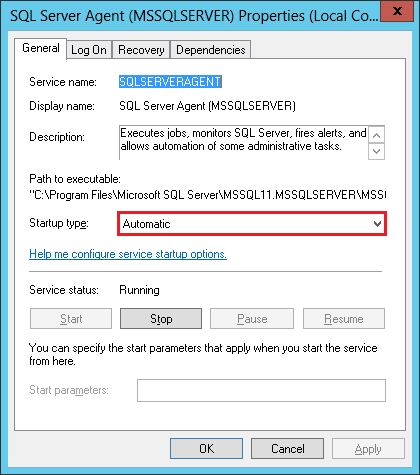
This way the service should start automatically, regardless if the server is restarted.
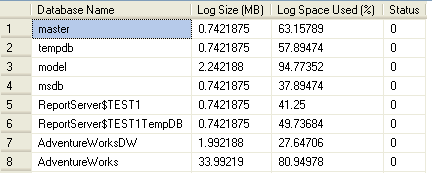
DBCC SQLPERF (logspace) is a useful command that is used to check
the status of the transaction log.
The next step is to create a sub-plan for cleaning up the obsolete
database backups and logs. To do this, press the Add Subplan button from the support plan toolbar.
Creating a sub-plan to delete old database backups and logs
Enter a name and description, as shown in the figure below.
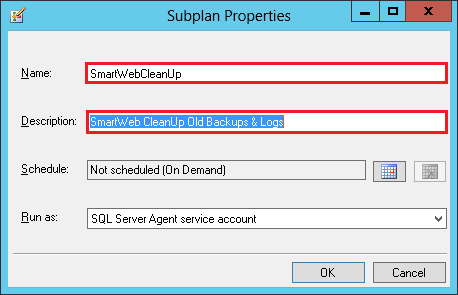
Set the time of execution by selecting the calendar from Schedule, as shown in the figure below.
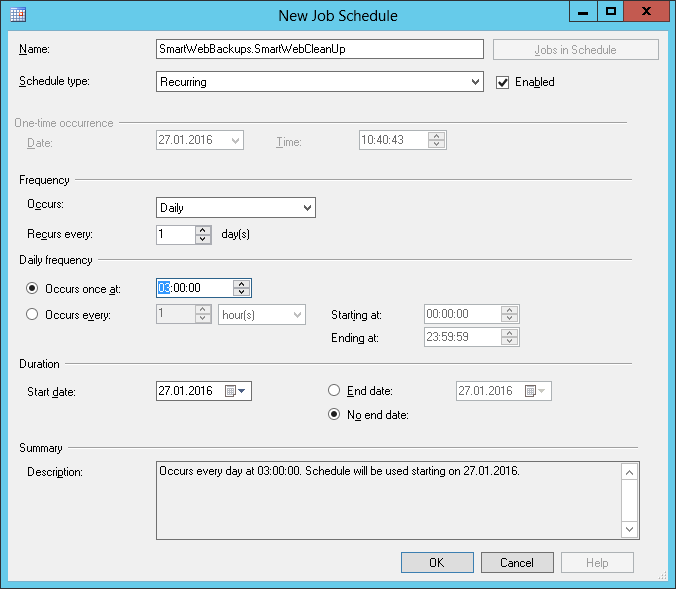
The plan will be executed daily at 3 a.m.
Press the OK button, then save the plan (File > Save). After successfully saving the plan,
the asterisk in its name should disappear. Similarly to
the previous sub-plan we created, select the order of the new sub-plan. From the Toolbox drag Maintenance Cleanup Task into
the empty space under the plan. Then drag History Cleanup Task under it.
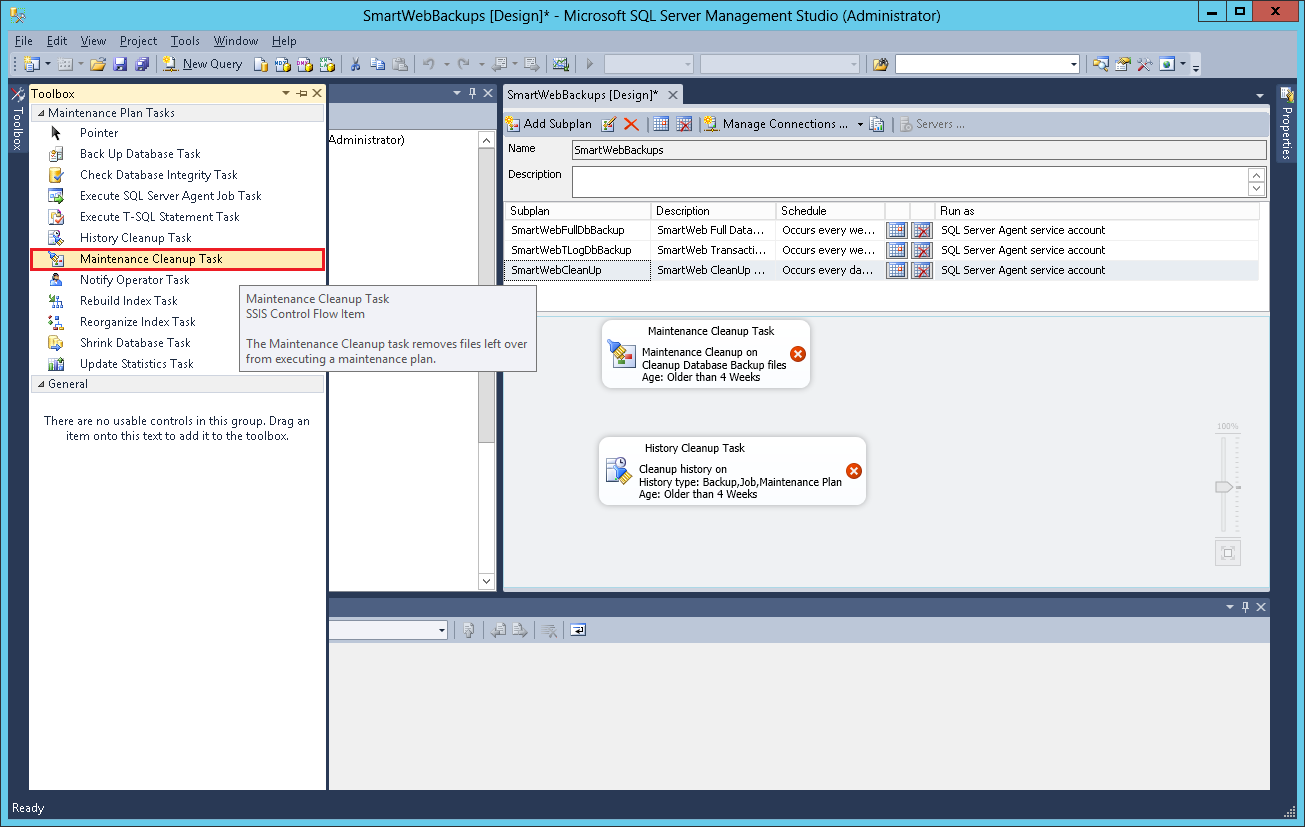
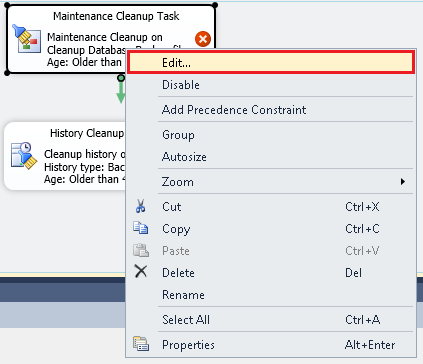
Right-click on the task that was just created - Maintenance Cleanup Task, and select Edit from the context menu.

In the Folder field,
select the folder we created to save the copies to
(C: \\ DB \ _Backups). In the File extension field, enter *.* for all files.
Set the time interval to delete files. To do this, check the Delete files based on the age of the file at task run time option, and set the Delete files older than the following option to 3 weeks, i.e. all files older than 3
weeks will be deleted. You can increase it time, but take into account how much free space you have. Press
OK button when you're done.
Right-click on the task that was just created - History Cleanup Task, and select Edit from the context menu.
Set the time interval to delete logs. To do this, set the Remove historical data older than option to 3 weeks, i.e. all logs older than 3 weeks will be
deleted.
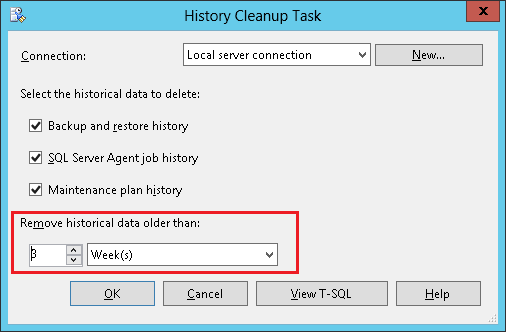
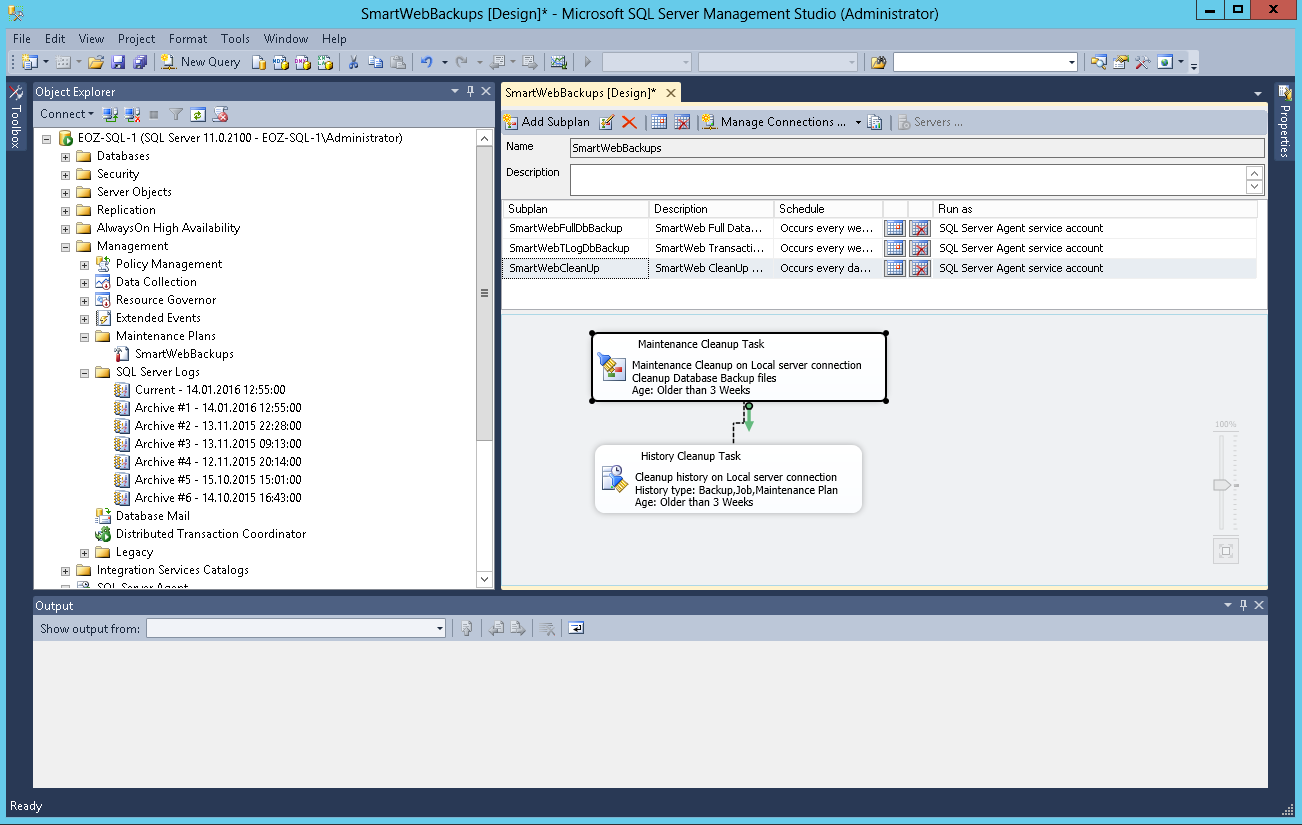
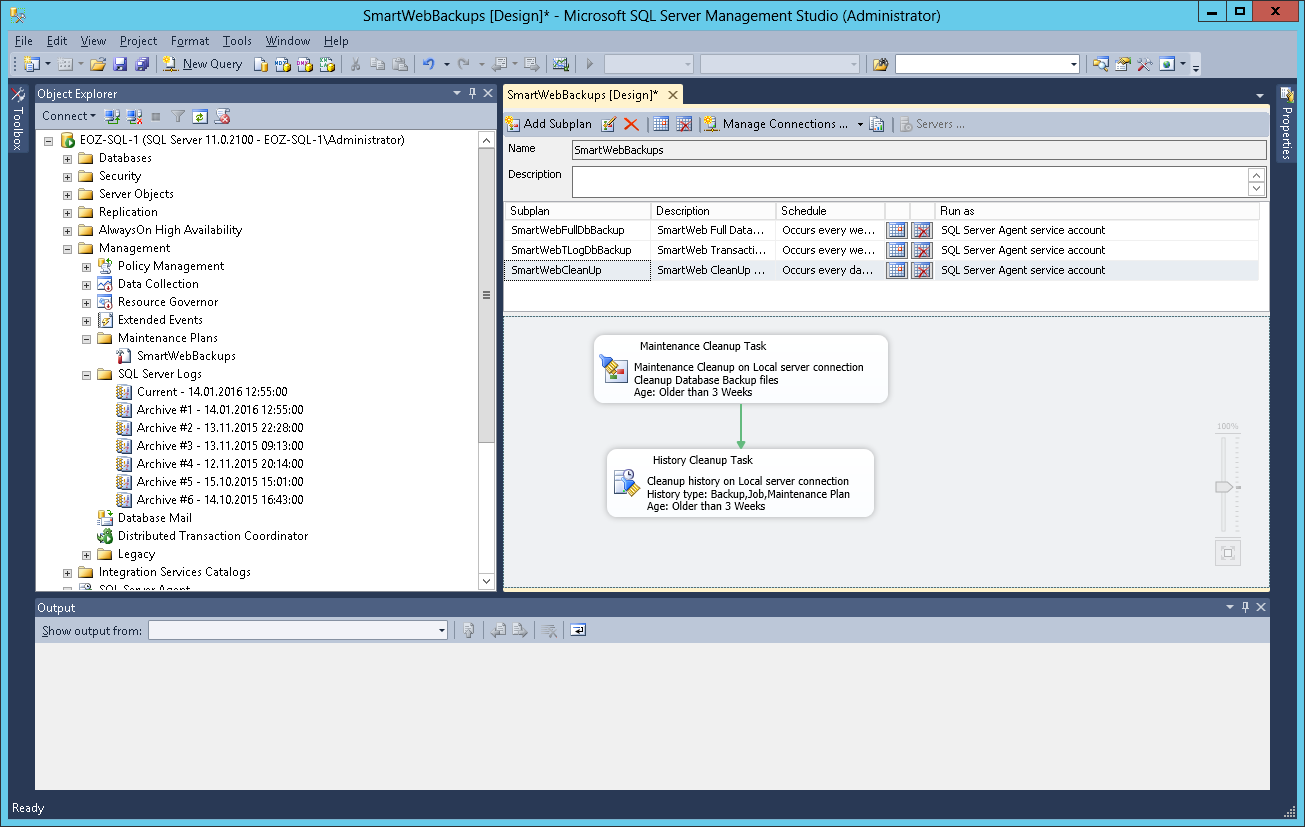
Press the OK button when you're done. The last thing left
is to connect the two tasks. To do this, drag and drop the tip of the green arrow to the second task and drop it, as shown in the figure below.
Save again (the toolbar diskette or from the menu -
File > Save). The asterisk from
the name of the plan should disappear, if it is still visible, that means the plan has
unwritten changes - save them.
We've added a sub-plan named SmartCleanUp that will be executed every
day at 3 a.m. This sub-plan will perform two tasks - deletion of backups and logs of the SmartWeb database that are older than 3 weeks.