To help you learn the material covered in this chapter, it is a good idea to read the Architectural Considerations and Multitenancy chapters first. These chapters provide the background knowledge necessary to understand the material in this chapter. The Architectural Considerations chapter describes the modes and architectures in which SmartWEB operates. The Multitenancy chapter describes how to set up and manage tenants in Мultitenancy mode. The two modes, Multitenancy and Load Balancing, are complementary and almost always work together. They can work independently, but working together makes the system a Cloud-Ready Enterprise System with excellent utilisation of server computing power and providing the desired level of application redundancy.
Overview
The following diagram illustrates how the two Multitenancy and Load Balancing modes work together.

As mentioned earlier, using both modes together is the typical case, so we will discuss it in this chapter. If you want to use Load Balancing without Multitenancy, it is like having multiple SmartWEB applications on multiple server platforms that only work with the Default Tenant.
The overall system in Load Balancing mode consists of the following components:
- Two or more SmartWEB Application servers
- Database server
- Redis Cache server
- Load Balancer server
- External Data Sources (Not the subject of this chapter)
The Database server, Redis Cache server and Load Balancer server must be on different machines from those used for the SmartWEB applications. They can be deployed on a single server or on separate servers and can also be part of a cloud services ecosystem. In other modes, Redis Cache is used to cache content and other commonly used components and is not a required component. In Load Balancing mode, Redis Cache is a required component. Using Redis Cache, the tenant instances of all SmartWEB application servers exchange messages with each other using the Pub/Sub services provided by Redis Cache.
To illustrate the configuration and operation of Load Balancing mode, we will use three Windows servers. The first server will host the Load Balancing server, the Database Management server and the Redis Cache server. The other two servers will be SmartWEB application servers as a redundant pair of servers hosting the tenants.
Database Preparation
We need to create a separate database for each tenant and we also need to create one database for the Default Tenant. Databases and database users are configured in the same way as described in the Multitenancy chapter. You can use the information in this chapter to create your databases and users.
Also, using a text editor, open the pg_hba.conf file in the data directory of the PostgreSQL server. Add a configuration line for each application server you want to connect to the database, replacing A.B.C.D with the IP address of the server.
host all all A.B.C.D/32 scram-sha-256
Redis Cache Preparation
We will not describe how to install the Redis Cache server here. This information can be found on the official Redis Cache website. We assume that the Redis Cache server is installed. Now we need to check the server configuration file to see if it is allowed to connect to the server from other machines, and we also need to check which TCP port the server is listening on for client connections. Go to the installation directory of the Redis Cache server and open the file redis.windows-service.conf. Look for the following parameters:
bind 0.0.0.0
port 6379
- The
bindparameter allowsRedis Cacheclients to connect to the server from external IP addresses. Specific addresses can be listed here, or filters can be applied. A value of0.0.0.0means all IP addresses.- The
portparameter specifies the port on which theRedis Cacheserver listens for client connections. The default port isTCP/6379.
Firewall Configuration
If you have a firewall running on the server, make sure that there are firewall rules that allow external clients to access the Database and Redis Cache servers.
Using the Cloud Ecosystem
If you are running in a cloud environment and using Database and Redis Cache as services from the cloud ecosystem, you won't be able to check the server configuration because the hosting administrators take care of that. Instead, you must follow the cloud provider's instructions for connecting to the servers.
Application Servers Preparation
Once we have prepared the necessary databases and installed and configured the Redis Cache server, we can proceed to configure the SmartWEB application servers. In this chapter we will not describe how to install a SmartWEB server. This is done in the Getting Started chapter. Here we assume that you have installed SmartWEB on both machines, i.e. that you have installed and configured IIS on them, and that you can browse and login to http://localhost locally from both servers.
IIS Setup
When preparing application servers to participate in the load balancing scheme, you will need to make some additional settings on the IIS server. Start the IIS Server Manager and open the Advanced Settings of the SmartWEB application pool. Configure Start Mode = AlwaysRunning and Idle Timeout (minutes) = 0 parameters as shown in the following figure.

There are two other parameters in the CPU section which are useful when working in a heavily loaded environment. These are Limit (Percent) and Limit Action. You can set them as shown in the figure.
Now open the Advanced Settings of the SmartWEB site and configure the Preload Enabled = True parameter as shown in the following picture.

In order for this parameter to take effect, you must install an additional operating system feature. To do this, open the Add Roles and Features Wizard and install the Application Initialisation feature as shown in the following figure.
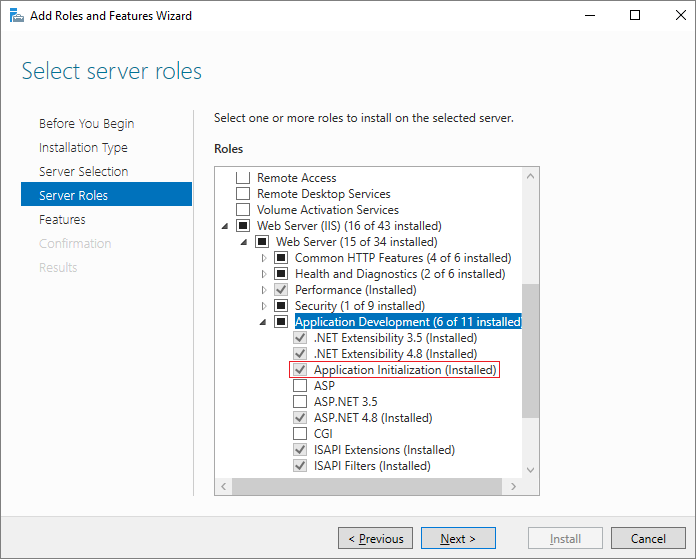
Do these IIS configurations on all application servers. A description of the configuration parameters can be found in the official Microsoft documentation.
In order to have one-time authentication of users on all application servers, the machine keys of the SmartWEB sites on all application servers must be the same. To configure them, open the Machine Key configuration panel of the SmartWEB site on the first application server and deselect both the Automatically generate at runtime options. Generate new keys using the Generate Keys action link on the right hand side of the panel.

Copy these keys and place them on all the application servers. The other two options, Validation method and Encryption method should also be the same on all servers. If the Machine Key configuration is the same on all application servers, then users are authenticated without having to provide credentials when their requests are routed by the Load Balancer between different application servers.
Default Tenant Instalation
The initial installation of SmartWEB on the application servers may have been done using a local database or another database. It is also possible that the installation was done with an inappropriate recipe. In order to make sure that the sites are running with the correct database and that the correct recipe has been used during the installation, we are going to perform an initial initialisation. To do this we need to stop the SmartWEB application pool on both servers and delete the contents of the inetpub>SmartWeb>App_Data>Sites> folder on both application servers.
Before proceeding with the initialisation of SmartWEB, we also need to configure Redis Cache client to connect to the Redis Cache server we prepared in the previous section. To do this, go to the inetpub>SmartWeb>Modules>Smartsys.Redis> folder and open the redis.config file with a text editor. Configure all lines as follows, replacing A.B.C.D with the actual Redis Cache server address. Do this for all application servers.
<configuration>
    <connectionStrings>
        <add name="Smartsys.Redis.OutputCache" connectionString="A.B.C.D:6379,
                syncTimeout=10000, abortConnect=false, cid=0" providerName="0" />
        <add name="Smartsys.Redis.Cache" connectionString="A.B.C.D:6379,
                syncTimeout=10000, abortConnect=false, cid=1" providerName="1" />
        <add name="Smartsys.Redis.DataCache" connectionString="A.B.C.D:6379,
                syncTimeout=10000, abortConnect=false, cid=2" providerName="2" />
        <add name="Smartsys.Redis.ObjectCache" connectionString="A.B.C.D:6379,
                syncTimeout=10000, abortConnect=false, cid=3" providerName="3" />
        <add name="Smartsys.Redis.NHibernateCache" connectionString="A.B.C.D:6379,
                syncTimeout=10000, allowAdmin=true, useQueryCache=false,
                abortConnect=false, cid=4" providerName="4" />
        <add name="Smartsys.Redis.UserCache" connectionString="A.B.C.D:6379,
                syncTimeout=10000, abortConnect=false, cid=5" providerName="5" />
        <add name="Smartsys.Redis.MessageBus" connectionString="A.B.C.D:6379,
                syncTimeout=10000, abortConnect=false, cid=6" providerName="6" />
    </connectionStrings>
</configuration>
You are now ready to run the SmartWEB application pool on the first server. If you navigate to http://localhost on the first server, an initialisation page will open. The initialisation process is described in the Multitenancy chapter. Follow the steps in that chapter and fill in the required information. The first tenant to be created is the Default Tenant and in the Connection string field you must specify the database intended for the Default Tenant. In the Recipe field you must select SmartWeb Web Farm Core. Click on the Finish Setup button to start cooking the recipe. The recipe used will enable the modules required for the application server to operate with Load Balanser at front. Once you have successfully cooked the recipe, you can log in to the Admin Panel and you will see the Default Tenant in the list of tenants.
Installation Errors Handling
If errors occur and you are unable to cook the recipe, you should go to the inetpub>SmartWeb>App_Data>Logs folder and investigate the reasons for the failure using the error records in the log files.
You already have the Default Tenant installed on the first application server that is connected to the database and to the Redis Cache server. You need to do the same initialization of Default Tenants on the other application servers. Since the Default Tenants on the other application servers must connect to the same database and the same Redis Cache server, you can make your job easier by grabbing the redis.config configuration file from the directory inetpub>SmartWeb>Modules>Smartsys.Redis> and copy it to the other application servers. This way you will be sure that all servers are using the same configuration on their Redis Cache client. You can do the same with the site configuration. Get the Default folder from the inetpub>SmartWEB>App_Data>Sites> directory and copy it over all the other application servers while the IIS application pool is stopped.
To test your environment run application pools and SmartWEB sites on all application servers. To ensure that all SmartWEB sites are working correctly, browse to http://localhost from each application server individually. If you can successfully login to all sites, this means that you have multiple Default Tenants running. All of them are using the same database and exchanging messages with each other using the Pub/Sub feature provided by the Redis Cache server.
Application Tenants Instalation
Once you have managed to run Default Tenant on all application servers, you can start creating the application tenants. To do this, browse to http://localhost/Admin/MultiTenancy on any of the the application servers and create a new tenant using the Add a Tenant button. Follow the steps described in the Multitenancy chapter to create a new application tenant.
Tenant Management Module
When we installed the Default Tenant above, we used the SmartWeb Web Farm Core recipe. This recipe enables the Multi Тenancy module and you don't need to do this manually.
Fill in the required information. For Database, select one of the databases you prepared for the аpplication tenant. Click the Save button to create the tenant. Once you have successfully created the tenant, you will need to initialise it. Again, follow the steps described in the Multitenancy chapter. Fill in the required information. In the Recipe field, you must select SmartWeb Web Farm Tenant. This recipe will enable the necessary modules to run the tenant behind a Load Balancer where there are multiple active instances of the tenant deployed on different application servers.
Once you have successfully cooked the recipe, you now have your first application tenant. However, this tenant is only running on the application server where you ran the recipe. Its instances on the other application servers are still in the Uninitialised state. This is done so that you can finish building content or other necessary settings before all instances of the application tenant are started. You can access the tenant from the application server on which you created it by browsing to http://localhost/tenant1, where tenant1 is the tenant prefix you configured when you created the tenant. If you have content ready, you can load it or start creating it.
For demonstration purposes, let's load the demo content using the embedded recipes. Browse to the Modules link in the Admin Panel and open the Recipes tab. Run the two recipes one after the other:
- Smart Web Preconfigured Content
- Smart Web Demo Content
You can find out more about the recipes in the Modules chapter. Once you have successfully cooked both recipes, browse to the tenant's home page http://localhost/tenant1. Your browser will load a page similar to the one shown below.

Suppose you have built required content of your new tenant. You are now ready to initialise the tenant instances on the other application servers. To do this, go to http://localhost/Admin/MultiTenancy. Trigger Suspend/Resume sequentially for the specified tennant. This will start the tenant instances on all application servers. From this point on, the tenant instances on all application servers are synchronised and are always in the same state. This action is performed once after the initial initialisation of the application tenant. After this initial startup, the instances start synchronising automatically via the Pub/Sub feature. If you now browse the tenant home pages on the other application servers, the browser will display the same page.
Lucene Indexing Considerations
If you are building content for a tenant while its peers on other application servers are not yet initialised, you will need to rebuild the indexes after all instances have been initialised. This is necessary because SmartWEB uses the Apache Lucene Engine to index the content and the indexes are stored locally in the tenant's folder and each tenant creates its own indexes. Instances do not receive indexing and synchronisation messages prior to initialisation. A one-off rebuild of the indexes is required from the instance in which we created the content. Now that the other instances are initialised, they will receive an indexing messages and build their indexes. To rebuild the indexes, browse to http://localhost/tenant1/Admin/Indexing from the application server where you created the tenant and click on the Rebuild action for all available indexes. This will cause the indexes to be created on all tenant instances.
Media Content Considerations
If your tenant uses Media Content, you should ensure that the tenant instances' Media Folders are synchronised across the application servers. You can automate this process by using a third-party application to synchronise files and folders. The tenant Media Folder is located at inetpub>SmartWEB>Media>TenantName where TenantName is the name of the tenant you configured during installation. If the tenant doesn't use any Media Content, you don't need to do anything.
It is a good practice to configure IIS on each application server to add a Custom HTTP Response Header to the HTTP responses. This way, if you are working behind a Load Balancer, you will be able to identify which application server responded to а request. To do this, open the HTTP Response Headers configuration panel in IIS Manager. Using the Add link on the right hand side, add X-Served-By = NODE1 as shown in the image below.

Do this for all application servers by replacing the node number with the appropriate one for the given application server. This way each SmartWEB application will respond with a unique response header. If you now make a request to the WEB Server and open the browser inspection, in the Response Headers section you will see the header we added, as shown in the following image.

Once we configure Load Balancer and browse through it, we can do such inspection and this way we will see which application server is responding to our requests.
Load Balancer Configuration
As mentioned in the Overview section, we will use an MS IIS server as a Load Balancer, installed on the same machine as the PostgreSQL and Redis Cache servers.
Selecting Load Balancer
Any Load Balancer server that supports the Client Affinity and Preserve Host Header options can be used.
In order for IIS to work as a Load Balancer, two additional IIS modules need to be installed. These are the URL Rewrite module and the Application Request Routing module. Both modules can be downloaded from Microsoft. Once the two modules have been installed, an additional node called Server Farms will appear in the IIS Manager tree.
Create a new Server Farm by right-clicking on it. The wizard will ask you for the IP addresses of your application servers and then ask if you want to create a rule to route traffic to the servers. Answer Yes to this question.

The next thing to configure is the Server Affinity. To do this, select the new farm and double-click on the Server Affinity icon. You will see the screen shown in the next image. Enable the Client affinity option.

We also need to configure the Load Balancer algorithm. Double-click the Load Balance icon. Make sure the settings are as shown in the next screen.

Default Web Site Considerations
When the MS IIS server is installed, a Default Web Site is configured. This site should not be removed because the Application Request Router uses this default site to route requests to the farm.
You have made the basic settings, and now you can test Load Balancer behaviour. To do this, browse to http://localhost from the server where Load Balancer is installed. You will see the Default Tenant home page. If you browse to http://localhost/tenant1 you will see the home page of Tenant 1.
Once you have successfully opened the page through the load balancer, open a browser inspection and look for X-Served-By in the response headers as you did above. Identify which application server is serving your requests. Reload the page several times or browse to different pages. Make sure that all your requests are being served by the same application server. Now change the status of the application server serving your requests from Online to Offline. To do this, select Servers in the Load Balancer tree and then select the required application server. Click the Take Server Offline action link on the right hand side.
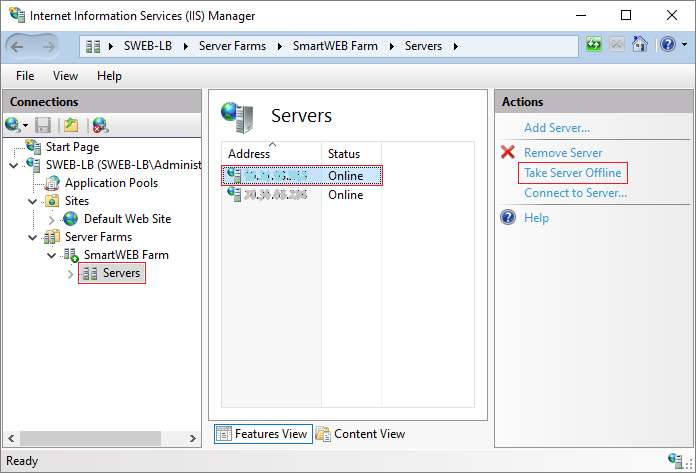
The application server that served your requests is now Offline. Reload the browser page. Your page should open smoothly and the browser should not ask for authentication. If you now check X-Served-By in the response headers, you will see that your requests are being served by a different application server. From here on you can start accessing the Default Tenant and your application tenants through the Load Balancer. You can test the round-robin algorithm yourself by configuring different users in your tenants and logging in from different computers or different browsers. You will see that Load Balancer will assign different application servers to serve different users using the round-robin algorithm.
Summary
In this chapter we have discussed in detail the configuration of SmartWEB in Load Balancing mode. If you have followed all the steps described here, you have now an environment that runs in both Multitenancy and Load Balancing modes. To configure an environment to run in Multitenancy mode only, refer to the Multitenancy chapter. The Architectural Considerations chapter briefly describes all modes of operation, along with their pros and cons.