SmartWEB's Smartsys Reporting module executes and visualizes
reports. Reports represent Excel spreadsheets that contain a special
syntax interpreted by a reporting service. The reporting service delivers the
requested data through Uniformance PHD.
Preconditions
-
Administrator rights on the SmartWEB application.
-
Enabled
Smartsys Reportingmodule.
Changing report's template folder
By default, reports are placed in a tenant's Media folder by the
SmartWEB application. The reports location can be changed. Open
File Explorer and navigate to the SmartWEB's application path
(e.g. c:\inetpub\SmartWeb), then to the tenant's Media subfolder (e.g.
C:\inetpub\SmartWeb\Media\Default). Create a new subfolder with the name
Reports. Sign in the SmartWEB site. Navigate to the admin's
Dashboard. Expand Settings in the navigation menu and
click the Smart Reporting link.

Press the Browse button and select the Reports folder. Optionally, you
can change, execute, download, or evict button's text. Press Save.

Report templates will now be placed in the Reports subfolder of the
tenant's Media folder (e.g.
c:\inetpub\SmartWeb\Media\Default\Reports).
Note:
The SmartWEB application has one permanent tenant that exists under the Default name.
Configuring Report Service
Navigate to the admin's Dashboard. Click the
Smart Reporting link in the navigation menu. This will display the
the page for managing Report Services. Press the Add New button to
create a new one.

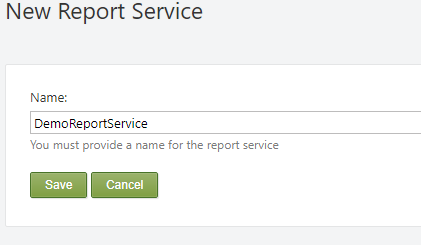
Provide name of the report service and press the Save button.
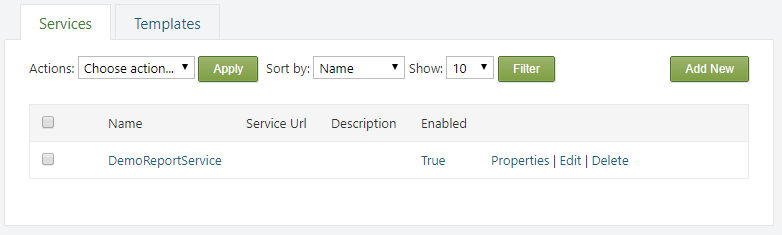
The new report service was created. From the Properties link, the name of the service can be edited. It can also be deleted via the Delete link.
Note:
You cannot delete the report service if there are related report templates.
Press the Edit link to configure the service.

A service URL must be provided for the Smart Reporting server (use the
net.tcp protocol prefix for TCP message transport or http(s) for
others). A description may be set. The Enable checkbox
enables communication through this service. The following three
checkboxes allow specific operations through this service.
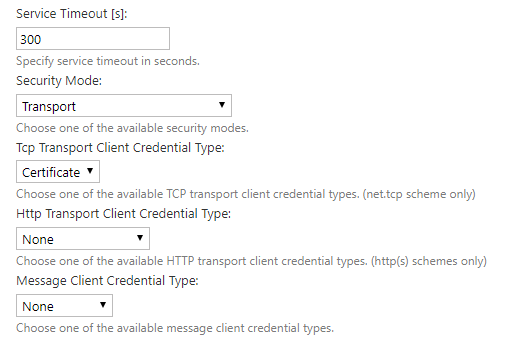
Service Timeout - specifies service response timeout in seconds.
The next four settings must be configured the same way, as those on the Smart Reporting server.
Security Mode - defines how the communication to the
service is secured. There are four available options:
None - no security.
Transport - uses transport security for mutual authentication and
message protection. The transport security is - SSL over HTTP or HTTPS,
when connecting to services that implement WS-* specifications, or TLS
(implementation is provided by the operating system) over TCP for binary
message channels.
Message - uses message security for mutual authentication and message
protection.
TransportWithMessageCredential - credentials are passed with the
message. Message protection and server authentication are provided by
the transport layer.
Tcp Transport Client Credential Type - defines the credential type used
for authentication when TCP is used for message transport (ignored if the
Security Mode is set to TransportWithMessageCredential).
The available options are:
None - specifies anonymous authentication.
Certificate - specifies client authentication using an X.509
certificate.
Windows - specifies client authentication using Windows.
Http Transport Client Credential Type - defines the credential type
used for authentication, when HTTP/HTTPS is used for message transport
(ignored if the Security Mode is set to TransportWithMessageCredential).
The available options are:
None - specifies anonymous authentication.
Basic - basic authentication is used. For more information, see RFC
2617 - HTTP.
Ntlm - specifies client authentication using NTLM.
Windows - specifies client authentication using Windows.
Certificate - specifies client authentication using an X.509.
certificate
Message`` Client Credential Type - defines the credential type used for
authentication when using message security.
The available options are:
None - specifies anonymous authentication.
Windows - specifies client authentication using Windows.
UserName - allows the service to require that the client be
authenticated with a user name credential.
Certificate - specifies client authentication using an X.509
certificate.
If the Use Authentication option is checked, the subsequent four
options are taken into account. These options are applicable only when the
client credential type is Basic, Ntlm, Windows or UserName.

Use Default Credentials- if checked, enables authentication with
default network credentials (applicable only for NTLM and Kerberos
credential types).
Domain- optionally set domain (applicable for Windows and NTLM
credential types)
If Use Authentication is checked, a username and password must be provided in their respective fields, or the Use Default Credentials option must be checked. In the case of default credentials - the SmartWEB application credential will be used.
Client Certificate Hash - client certificate thumbprint (applicable
only when the Certificate credential type is used)
Server Certificate Hash - server certificate thumbprint (applicable
only when the security mode is Transport or
TransportWithMessageCredential). If set, the server certificate
thumbprint will be tested for a match.
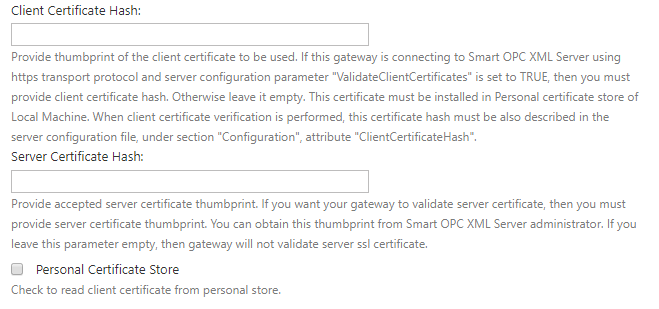
The client certificate must be installed on the same machine as the
SmartWEB application. If the certificate is installed in the
personal certificate store of the credential under - SmartWEB, then the Personal Certificate Store option must also be checked.
Note:
You will not be able to save the settings if the
Client Certificate Hash is provided and the certificate is not found on
the machine.
Note:
When installing a client certificate, it is better to use
Local Machine as the store location.
Warning:
The certificate thumbprint that is displayed in MMC certificate snap-in has an extra invisible unicode character. Do NOT copy the "extra space" that appears before the certificate thumbpint from the Richedit control. If you copy and paste the thumbprint with the extra (invisible) character, this will lead to errors like - unable to find client's certificate, or unable to validate the server's certificate.
Dns Identity - If you are accessing the server through an IP or a name that
differs from the server's certificate Common Name, set the
Dns Identity to that CN (applicable only with TCP transport
(net.tcp)). If you are using HTTPS transport, you have to access the server with the Common Name specified in
the certificate (you can map that name in your hosts file).
Recommendation:
Use Security Mode - Transport and
Tcp Transport Client Credential Type - Certificate. Provide server
and client certificate thumbprints. Set Dns Identity to the
Common Name of the server certificate.
Finally, save the configuration. Press the
Test connection button to check if the application connects to the
Smart Reporting server.
If the connection succeeded, a green message at the top of the page will be visible.

Smart Report Service Role Permissions
There are role permissions for the entire reporting module. Navigate to
the Users section via the navigation menu on the admin dashboard.
Click on the Roles tab.

The available roles can be seen here. Click on the desired role
scroll down to the Smartsys.Reporting permissions.

The available permissions are shown on the left side. The right side
has two columns - Allow and Effective. The Effective column shows the current
estimated permissions for that role. In the Allow column, the
role permission can be set. If a given role does not have permission over
specific action, regardless of the security policy of a given report, the
user that has that role will not be able to execute such
operations. Manage permissions must not be granted to regular users,
they are only for administering reporting services. In order for a given role to be able to administer reporting services, manage permission must be granted
to that role.
Creating Report Template
Click on the Templates tab (next to the Services tab).

The reports folder is located on the left side.
The report templates must be placed in that folder. As mentioned before, reports
represent Excel spreadsheets that contain a special syntax that is interpreted
by a reporting service. The extensions of the files are xls(x) or xlt(x).
Click on file from the expanded reports folder.
A configuration form for that report will be shows on the right side.
Name - provide a unique name for that report.
Description - a description can be set (optional).
Service Provider - select one of the available service
providers from the dropdown list (mandatory).
Cache - How long the report will be cached for (in minutes). 0 means no
cache.
Offset Seconds - an integer value. Each report is executed for a
particular date. If an offset (in seconds) is specified, it will be
added/subtracted to the date argument.
Min Confidence - The minimum percentage confidence (0 - 100%) below
which the value will be considered bad. If not specified, the report
server value will be used instead.
Enable Report Template - check to enable the report, otherwise it
can't be executed.
The final section is Permissions.
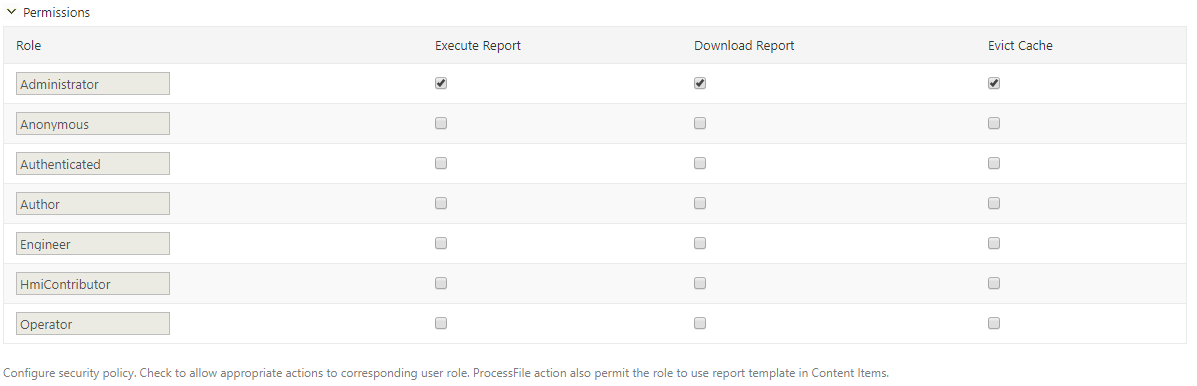
This section configures the security policy for the report. The roles are shown on the left-most column of the table. On the right side, there are columns with available actions. Below each action there is a checkbox determining if the action is allowed or not.
Finally, you can press the Save button to save the report
configuration. There is a caching mechanism for the reports, the Evict
button flushes all available caches for that date/report.
On the left side, under the reports folder there is a calendar control. From the calendar control, a date can be selected. Select a date and press the Execute button to
test the report.

The report can be downloaded via the Download button. The following
notification from Excel might appear:

Press the Yes button to open the report.
On the right side of the Execute button, there is a CleanUp
button. If that button is pressed, all configurations of reports with
missing (deleted) files will be deleted.
Attaching Reports in Content Items
The Smartsys Reporting Predefined Report part must be attached to the
Content Type (navigate to Dashboard>Content Definition,
open the appropriate Content Type and press the Add Partsbutton. Find the
Smartsys Reporting Predefined Report part and add it
to the Content Type).
Create or open an existing Content Item and attach the report template.

Press the Browse button and find a configured report template.
Additional CSS styles or classes can be defined to the report container by
filling the appropriate Style and/or Class fields.
Immediate execution - if set, the report is executed when a page with the
Content Item is requested and the result is shown immediately within the
page. The date argument passed during this execution is configured
further. If not set, the page is loaded without a result and waits for
user interaction to run the report (to press the Execute button).
Datetime picker - specifies what kind of UI control to be displayed.
There are three options available: Invisible (hides UI date control),
Date (shows the UI control for selecting days only), and
DateTime (shows UI control for selecting date and time).
Show report download link - if set, a download link will be shown
when the report is executed.
Show report evict cache link - if set, an evict link will be shown, via which the
report cache for a particular date can be flushed.
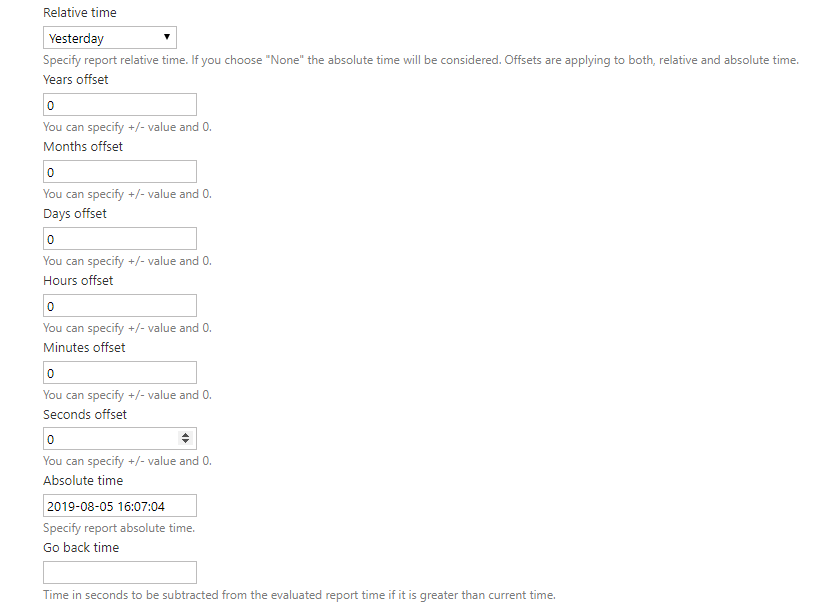
Relative time - a dropdown list with a presets of relative base
times. The relative time is estimated when a report page is being loaded. If
None is selected, then the absolute time is taken into account.
Years offset - an integer value which will be added/subtracted as
years.
Months offset - an integer value which will be added/subtracted as
months.
Days offset - an integer value which will be added/subtracted as
months.
The next offsets are shown only if Datetime picker is set to
DateTime.
Hours`` offset - an integer value which will be added/subtracted as
hours.
Minutes`` offset - an integer value which will be added/subtracted as
minutes.
Seconds`` offset - an integer value which will be added/subtracted as
seconds.
These offsets are applied to the date argument of the report,
regardless if it is Relative or Absolute time.
Absolute time - specifies the report absolute time, which is taken into
account if the Relative time is set to None.
The following formula can be summarized:
Estimated Report Date (ERD) = Relative/Absolute time +/- Years offset +/- Months offset +/- Days offset +/- Hours offset +/- Minutes offset +/- Seconds offset +/- Offset seconds (from the configuration of the report template – see Creating Report Template).
Go Back Time - if the Estimated Report Date(ERD) is greater than
current time, this value (in seconds) is subtracted from the ERD.
Go Back Time is very useful when there is a report set to
show the results at 02:00 a.m. (The Relative time is set to
Today and the Hours offset to 2). Set Go Back Time to 86400
seconds (1day). If the user executes the report at 01:30 a.m., but
the Estimated Report Date is 02:00 a.m., which is in the future, the
Go back time will be subtracted from the Estimated Report Date and
the report will show the results for yesterday at 2:00 a.m. When the
user calls the report after 02.00 a.m. (the requested time will not be in the future,), Go back time will not be applied and the
report will show the results for today at 02.00 a.m.
Reports in Workflows
The Smartsys Reporting module has workflow activity named -
Execute Report. Before we continue, the Scheduler
module must be enabled. Go to the Dashboard, navigate to the
Modules section. Find the Scheduler module and click on Enable link to
enable it. Find the Email Messaging module and enable it.
Navigate to Dashboard>Settings>Email to configure it.
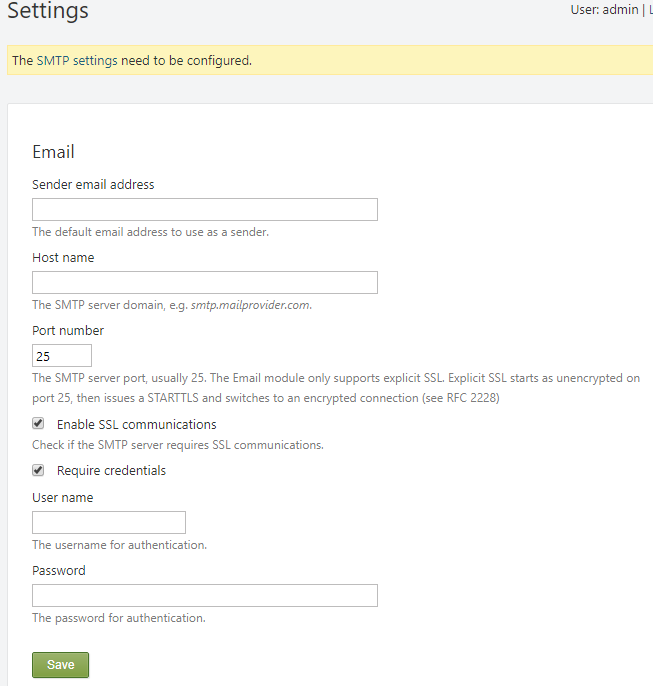
After configuring the Email module, press Save. The Email module is used to Send report results.
Note:
The Email module requires the Base URL
(Dashboard>Settings) of the site to be set, otherwise a warning
message will be displayed when accessing site setting on the dashboard.
Note:
The Email module only supports explicit SSL. Explicit
SSL starts as unencrypted on port 25, then issues a STARTTLS and
switches to an encrypted connection (see RFC 2228).
Navigate to Dashboard>Scheduler and add a new schedule.
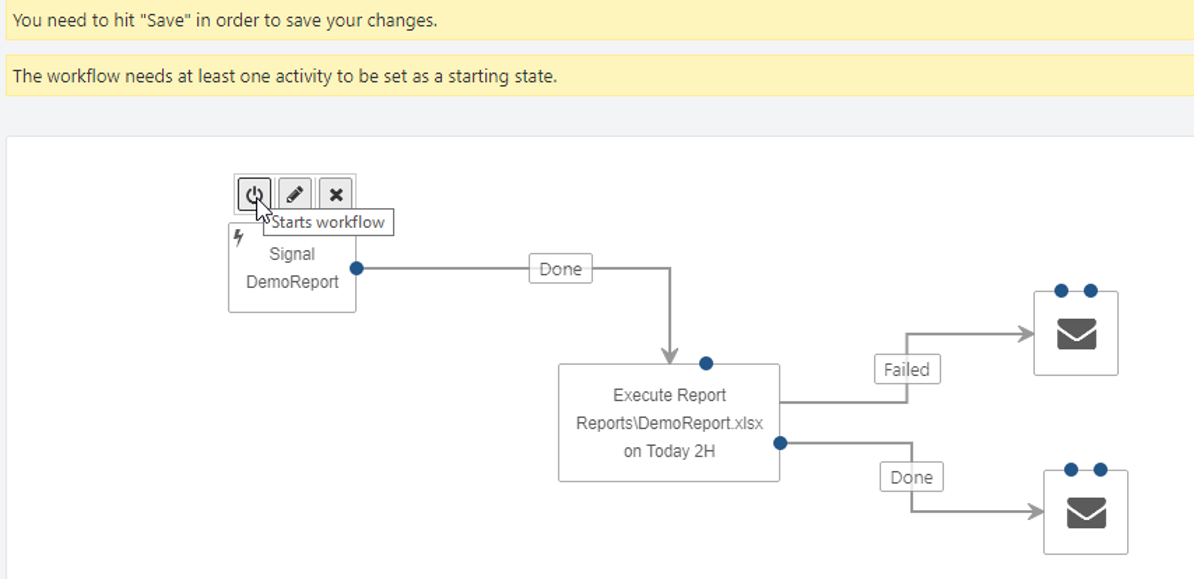
Set it's Signal(s) to trigger to DemoReport. Configure other
schedule settings and enable it.
Navigate to Dashboard>Workflows (Workflows module must be enabled)
and create a new workflow named Demo Workflow. Add Signal,
Execute Report, and Send Mail activities to the workflow.
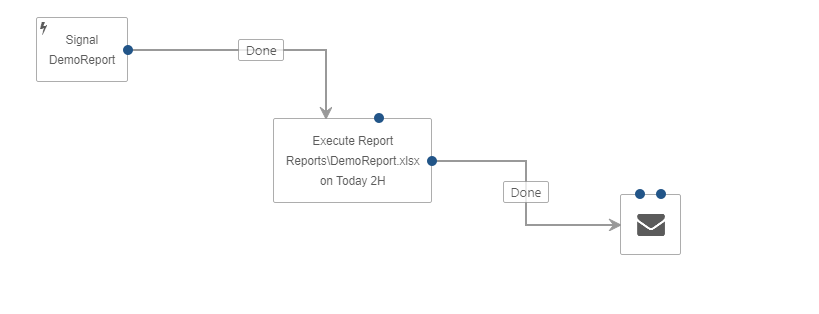
On the Signal activity, configure the Name of the signal to be
DemoReport. Connect the DemoReport Signal activity with the
Execute Report activity. Open the Execute Report activity to configure it.

In the Report field, enter the path to the configured report (you can see
the path from the report templates tab - Dashboard>Smart Reporting). This
activity supports only relative time, so configure it. If the report
template is not found, an error will be shown. Connect the Done output of
the Execute Report activity with the Send Mail activity. Open the Send Mail
activity and configure it.

Subject/body tokens can be used, such as:
{Workflow.SmartWeb.Reporting.ReportPath},
{Workflow.SmartWeb.Reporting.ReportName},
{Workflow.SmartWeb.Reporting.ReportTime}, and
{Workflow.SmartWeb.Reporting.ReportExecutionTime}, which comes with the
Smartsys Reporting module.
Optionally, an e-mail notification can be sent when the report has
failed. Exception tokens can be included, such as:
{Workflow.SmartWeb.Exception.Message} and
{Workflow.SmartWeb.Exception.Stack}.
Finally, activate the DemoReport Signal activity to enable the
workflow. When the set time is reached, a report will be executed, and the
result will be emailed.